INSTALLATION GUIDES
Installation Guide – Apron Front Sink (Undermount)
OVERVIEW
Apron front sinks require proper structural support and precise alignment. Due to the weight of copper and brass, installation must be carried out carefully to ensure long-term stability and performance.
Before You Begin
Professional installation is strongly recommended
Verify all dimensions before cutting
Due to the handcrafted nature of the sink, slight dimensional variations may occur
Always use the actual sink as a template
Ensure sufficient clearance for faucet and backsplash
Do not install until the product has been fully inspected
Tools & Materials
100% neutral-cure silicone
Level
Measuring tape
Support frame or support bars
Protective surface (to avoid damage during handling)
Installation Steps
1. Build the Support Structure
Construct a support frame inside the cabinet or install support bars along the sides.
The structure must support the full weight of the sink and hold it level, aligned with the top of the cabinet.
2. Position the Sink
Place the sink into the cabinet opening.
Ensure it sits level in all directions and is properly aligned with the cabinet front.
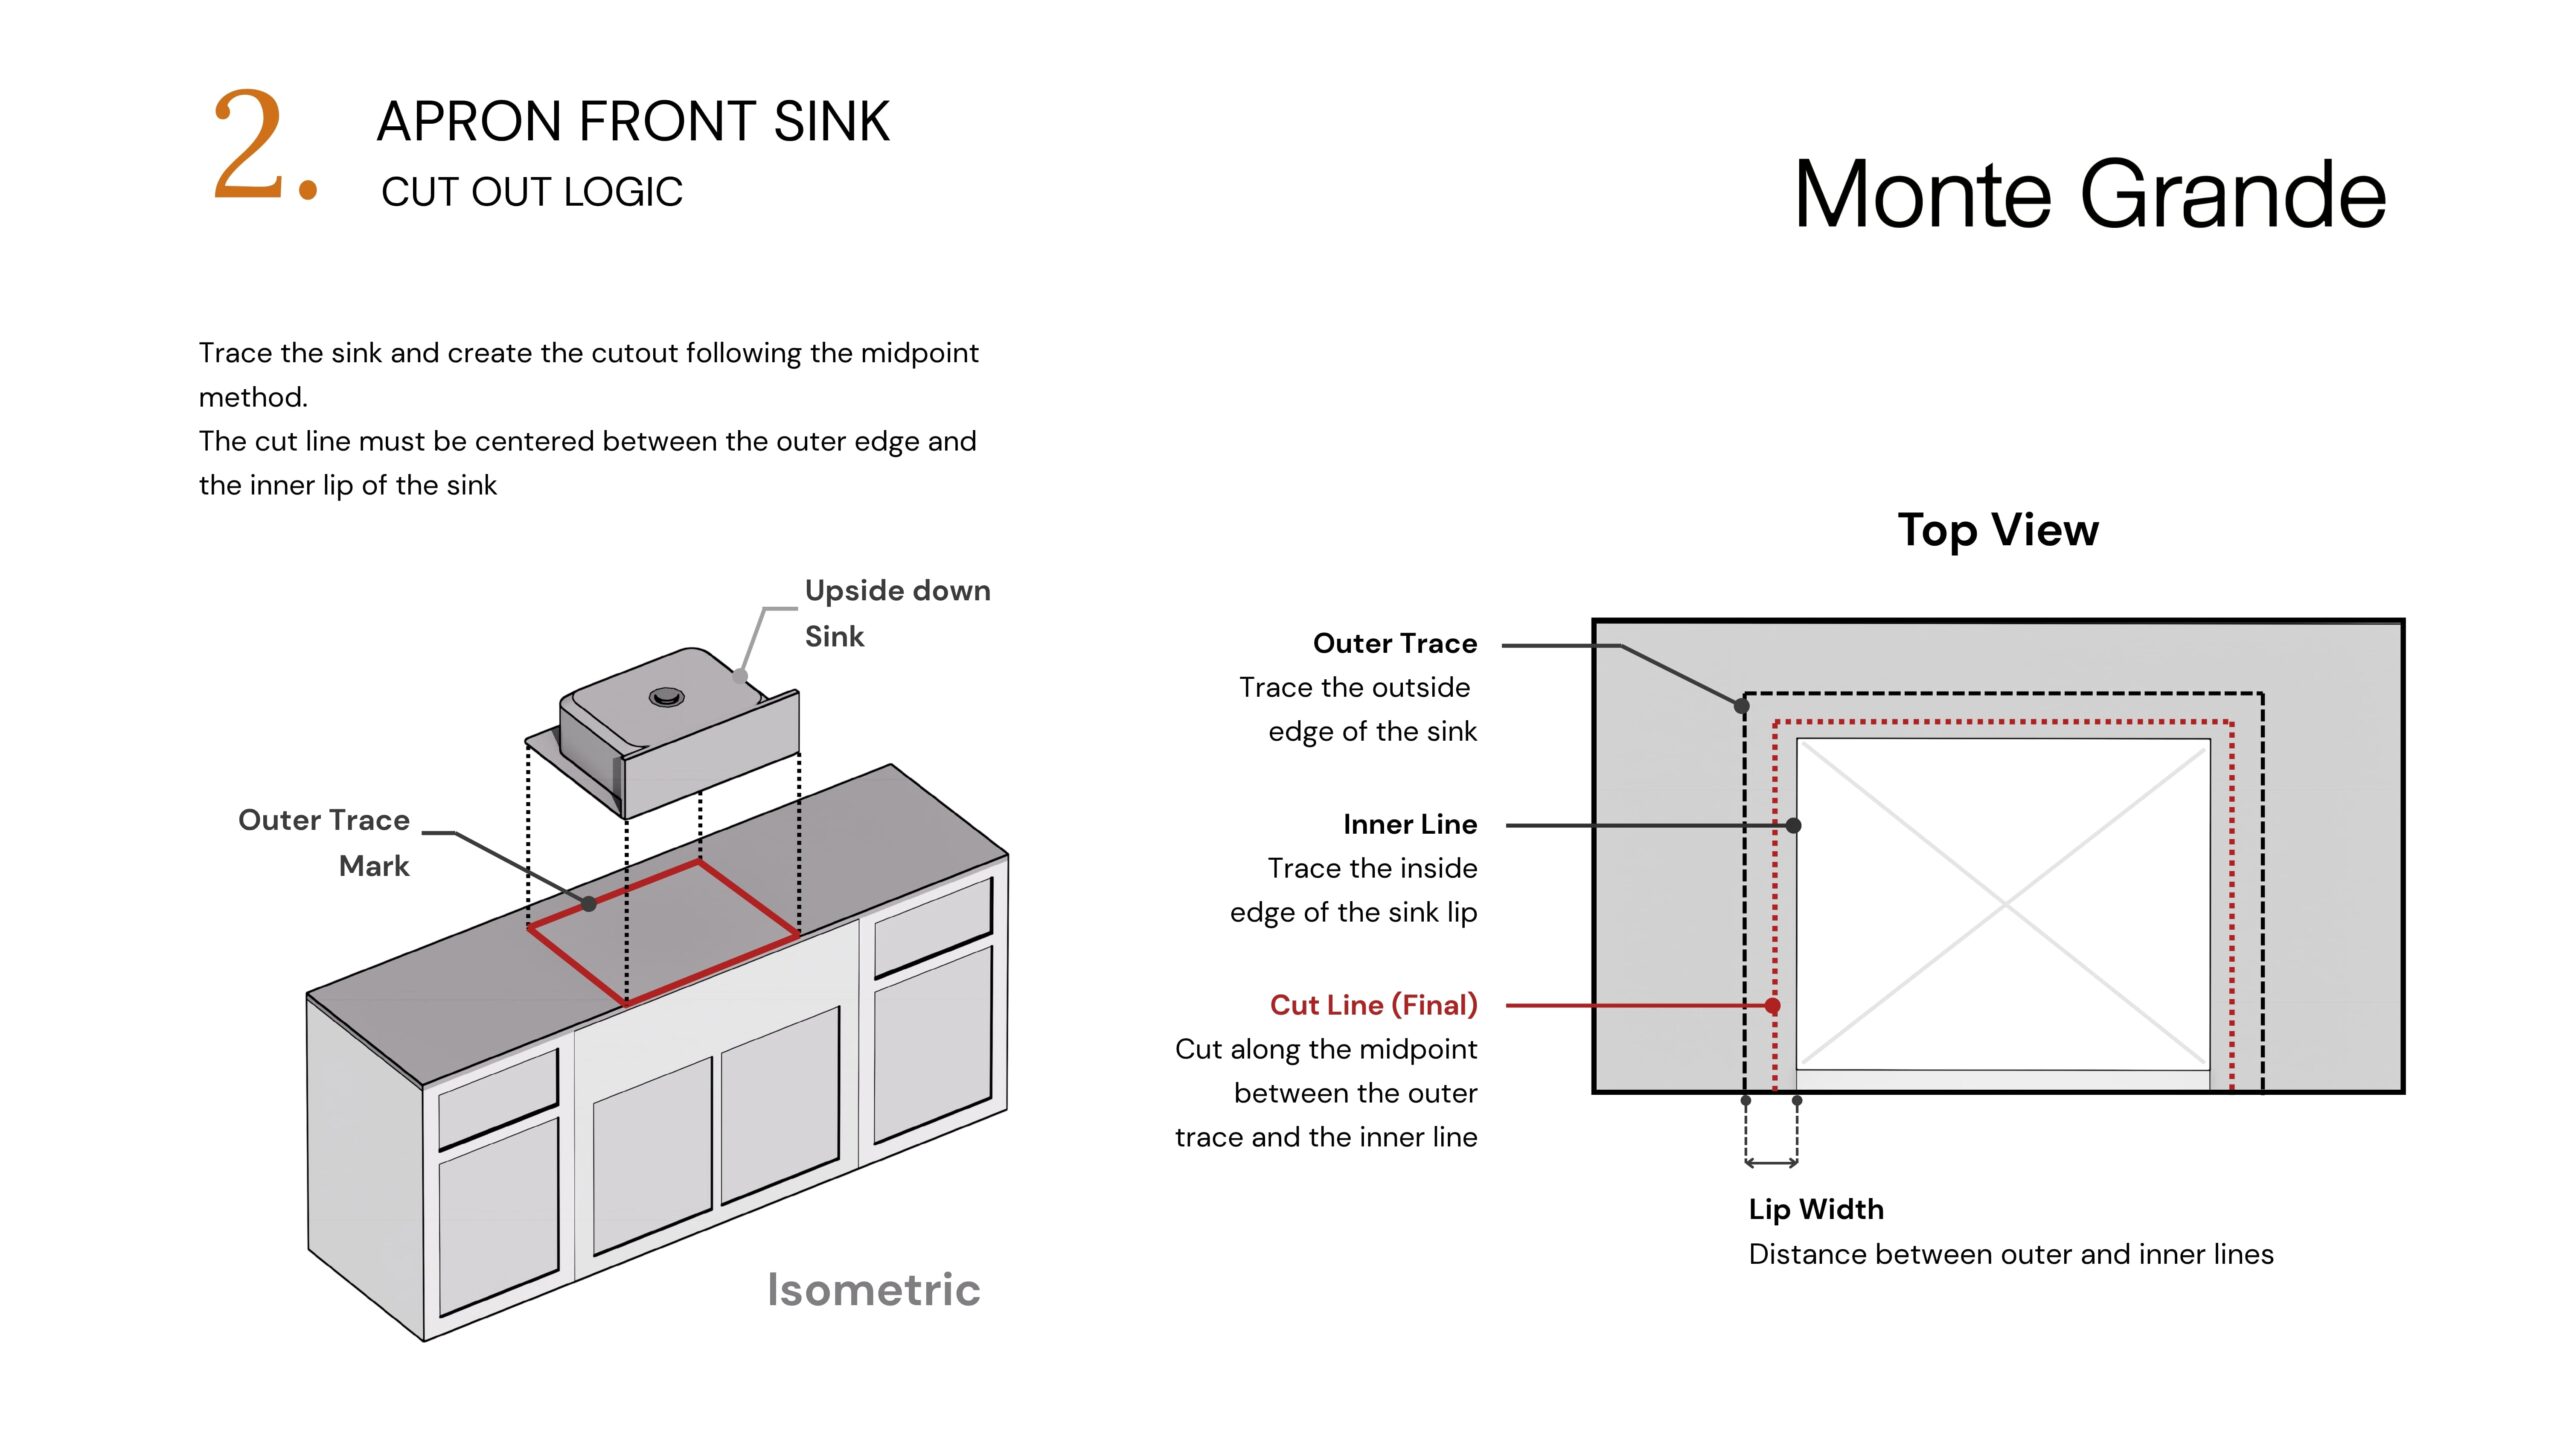
3. Mark the Countertop Cutout
Place the sink upside down on the countertop and trace the outer edge.
Measure the distance between the inner edge of the basin and the outer lip, and mark a second line inside the first.
4. Cut the Countertop
Cut along the midpoint between both lines to achieve the correct reveal.
Test fit the sink to confirm proper alignment.
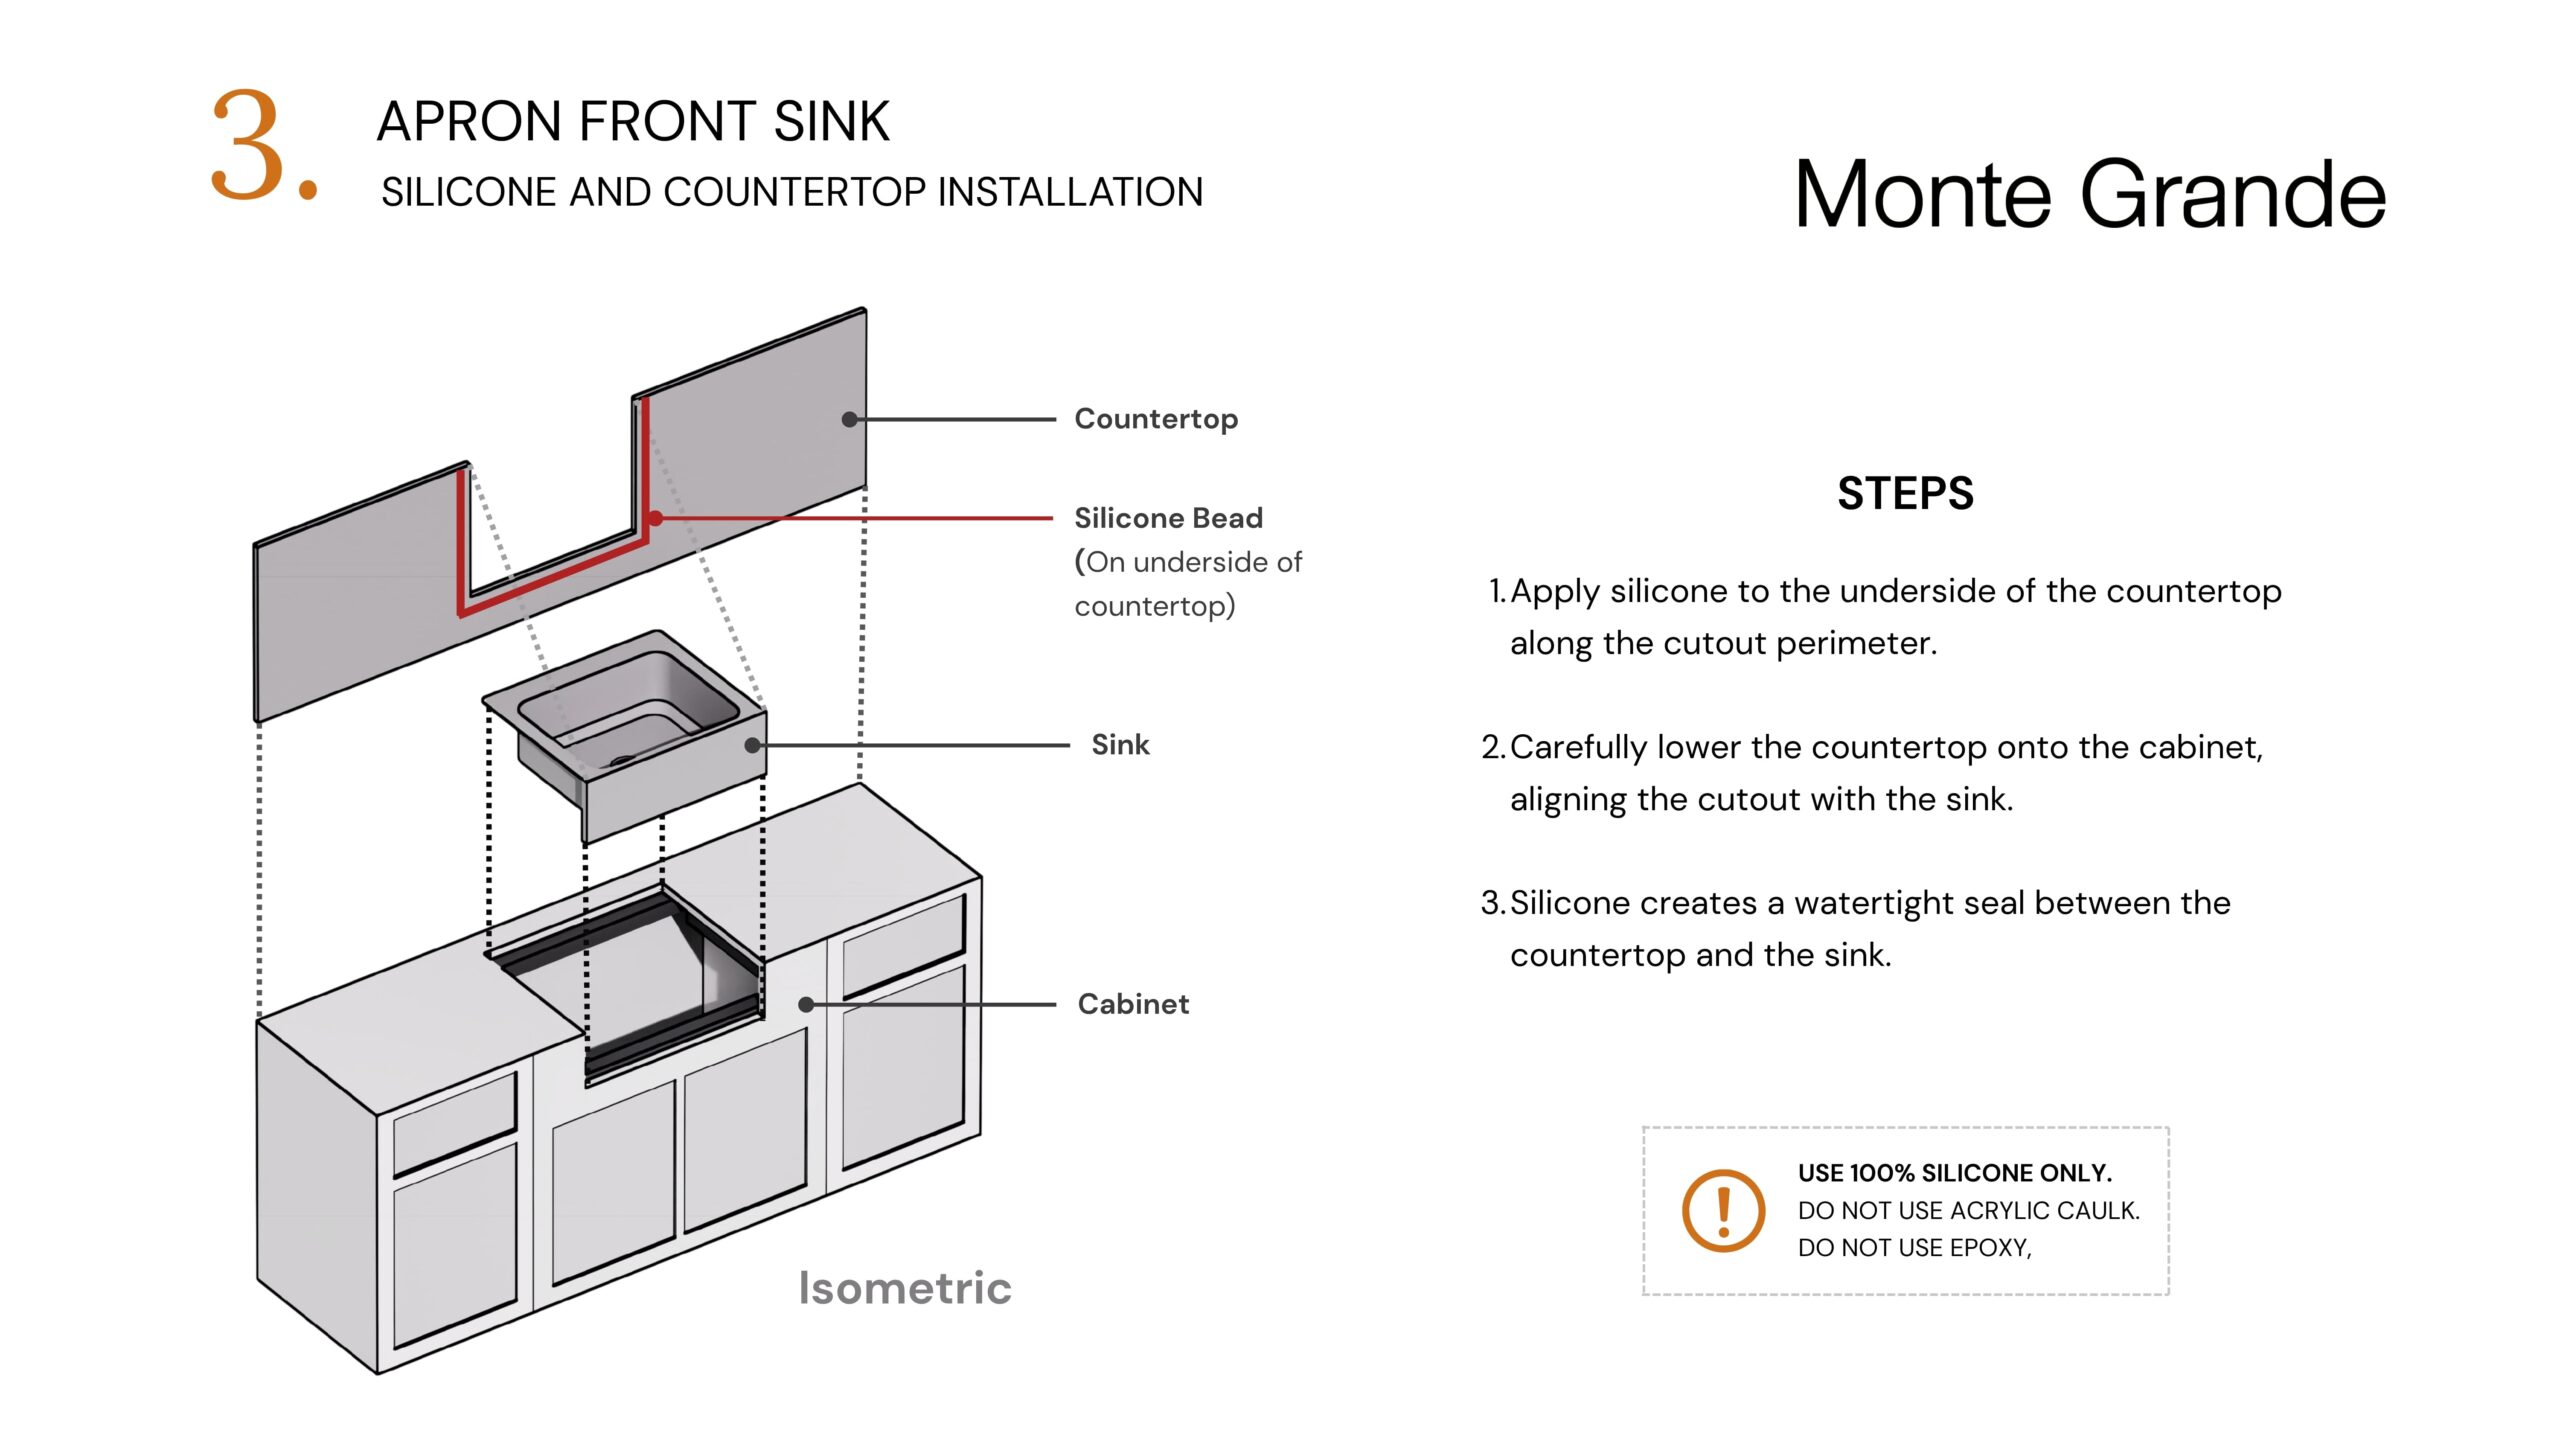
5. Apply Sealant
Apply a continuous, even bead of silicone to the underside of the countertop, following the full perimeter of the cutout.
The sealant should be placed exactly where the countertop will come into contact with the rim of the sink.
6. Install the Countertop
Carefully position the countertop over the sink and cabinet.
Lower it evenly into place, allowing the silicone to compress and create a watertight seal between the sink and the countertop.
Apply gentle, even pressure—do not shift the countertop once it makes contact.
7. Level and Adjust
Confirm the sink is level front-to-back and side-to-side before the silicone cures.
8. Clean Excess Sealant
Remove any excess silicone for a clean finish.
Important Notes
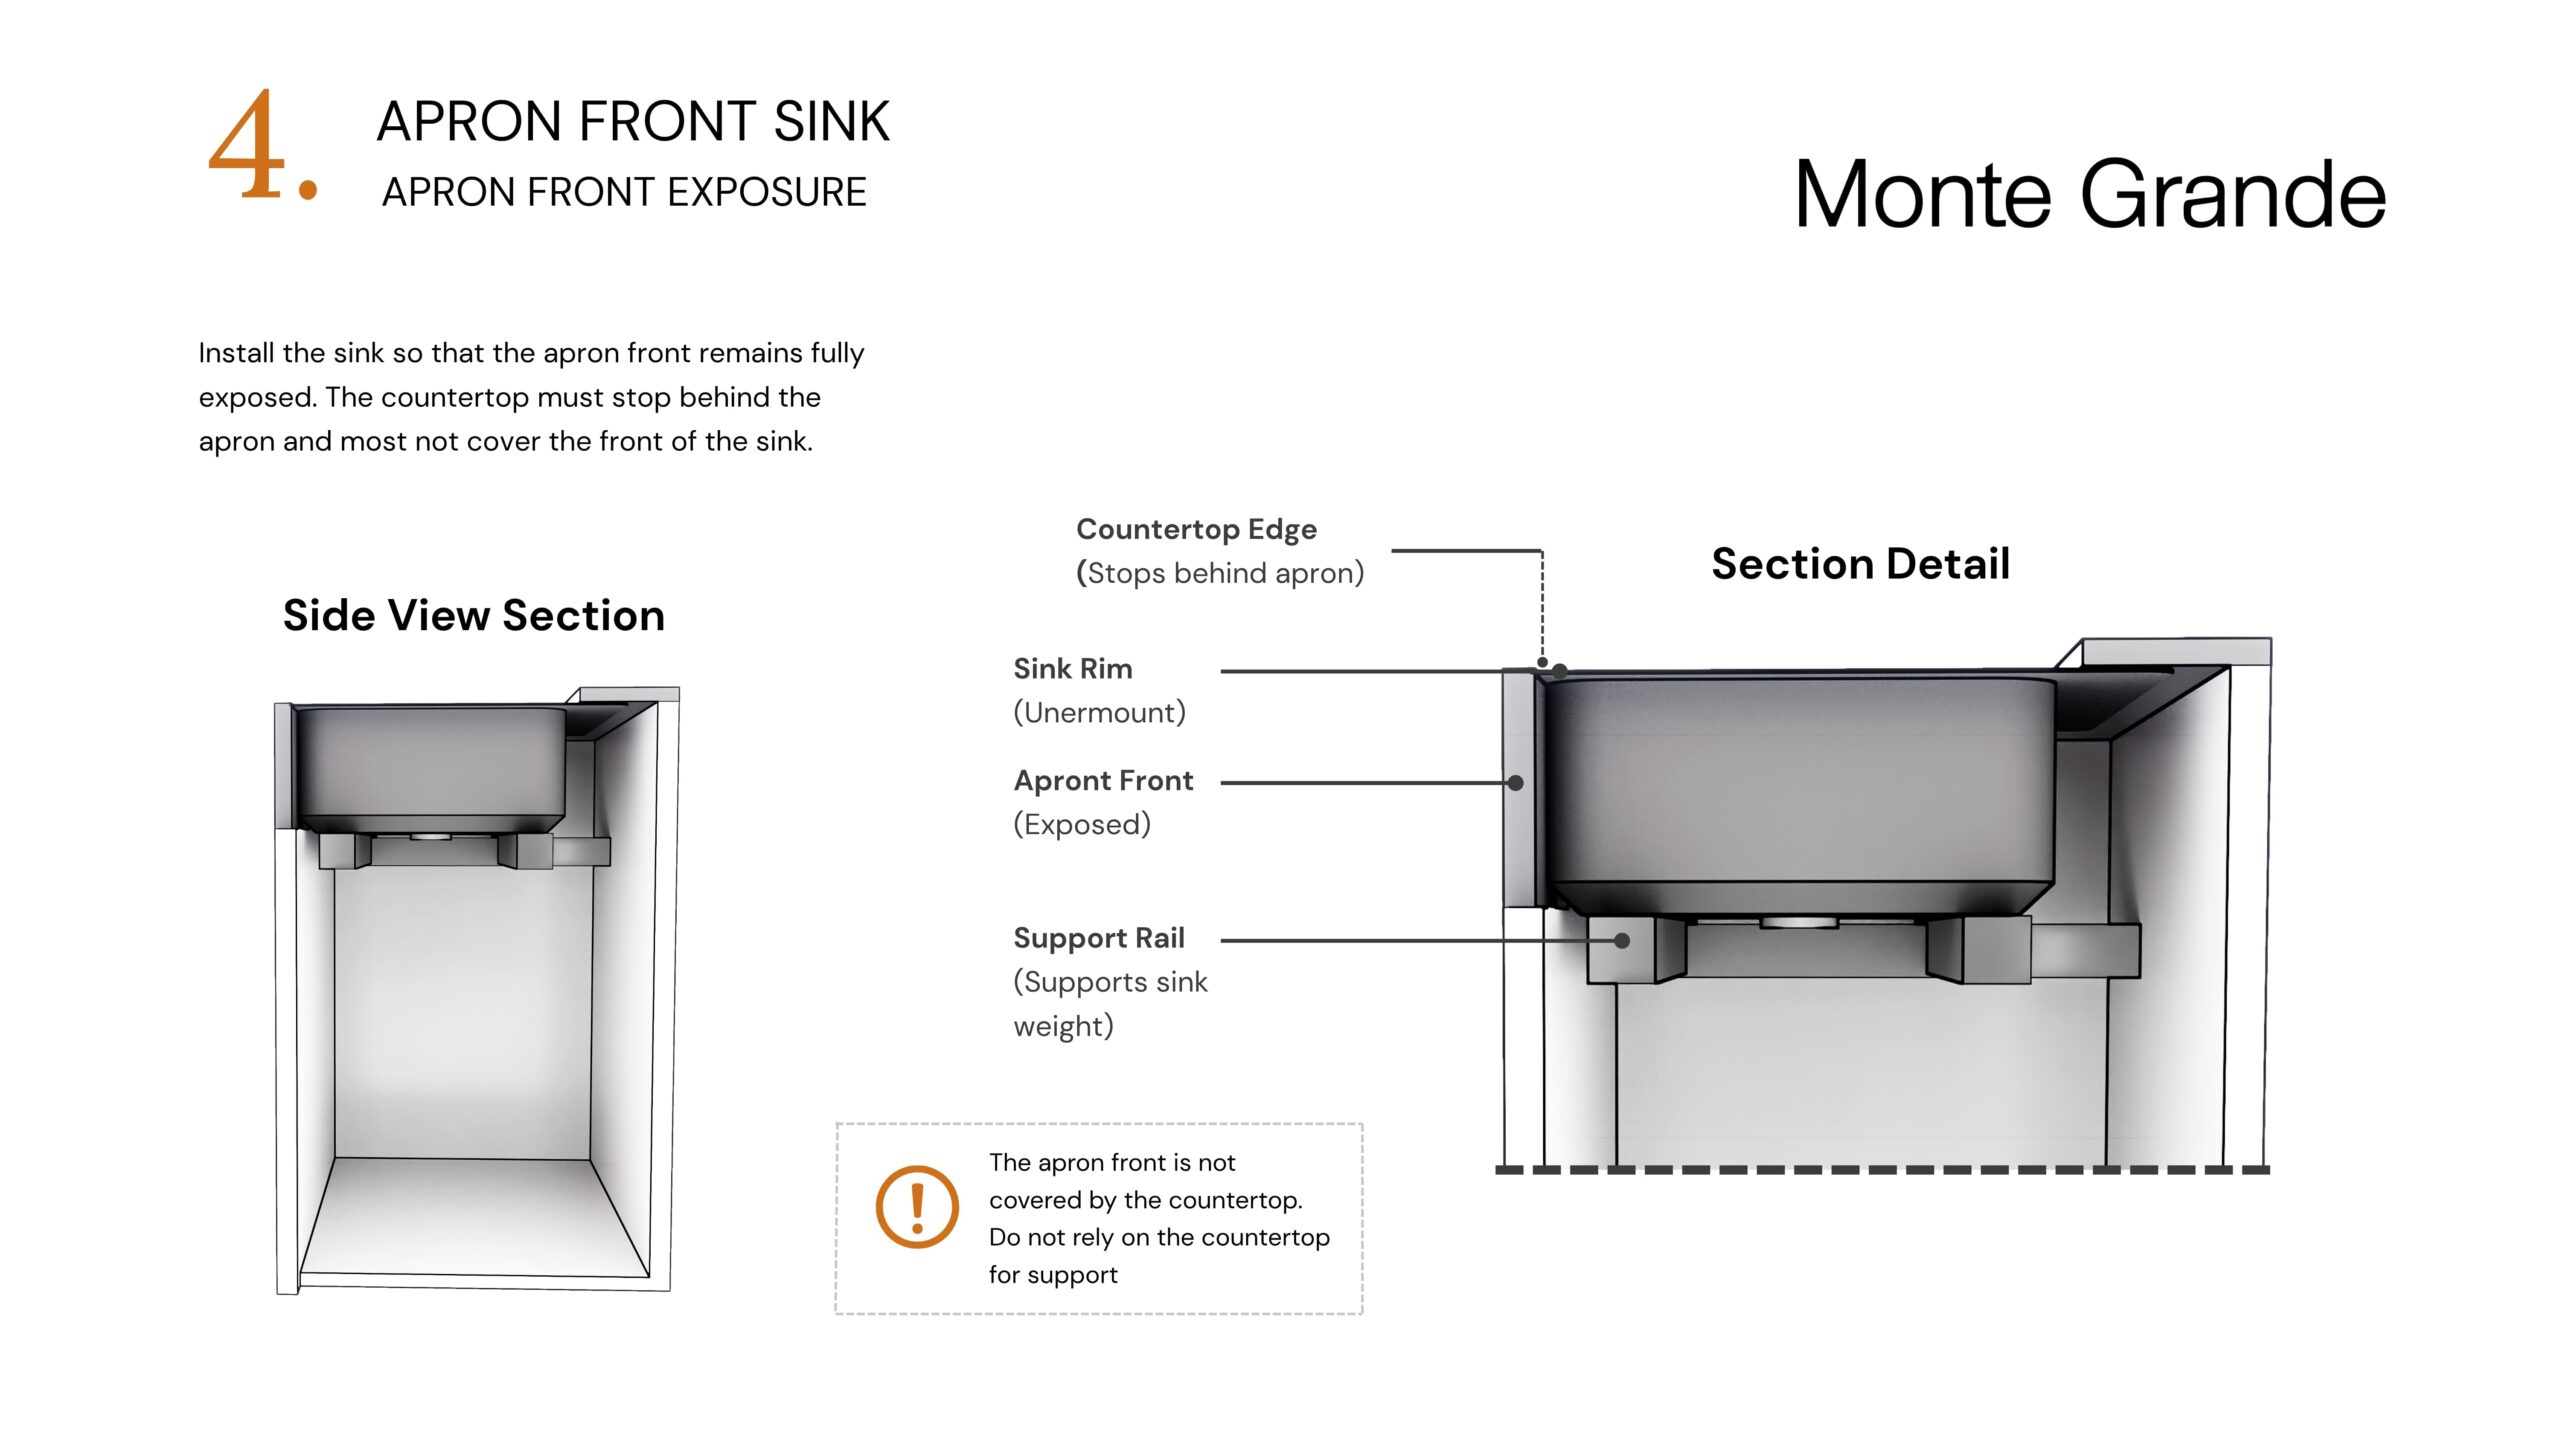
Do not rely solely on adhesive or clips — structural support is required
Do not overtighten drain components
Large sinks are heavy — handle with care and adequate assistance
Ensure all connections are watertight

Installation Guide — Drop-In Kitchen Sink
OVERVIEW
Drop-in sinks are installed from above, with the rim resting on the countertop. The rim supports the weight of the sink, while silicone creates a watertight seal.
Before You Begin
Professional installation is recommended
Use the actual sink as a template (handmade tolerances may vary)
Verify faucet and accessory clearance
Ensure the countertop is level and properly supported
Installation Steps
1. Mark the Cutout
Place the sink upside down on the countertop and trace the outer edge.
Measure the distance from the outer edge to the inner edge of the rim, and draw a second line inside the first.
2. Cut the Countertop
Cut along the inner line.
Test fit the sink in the opening to ensure proper alignment and fit.
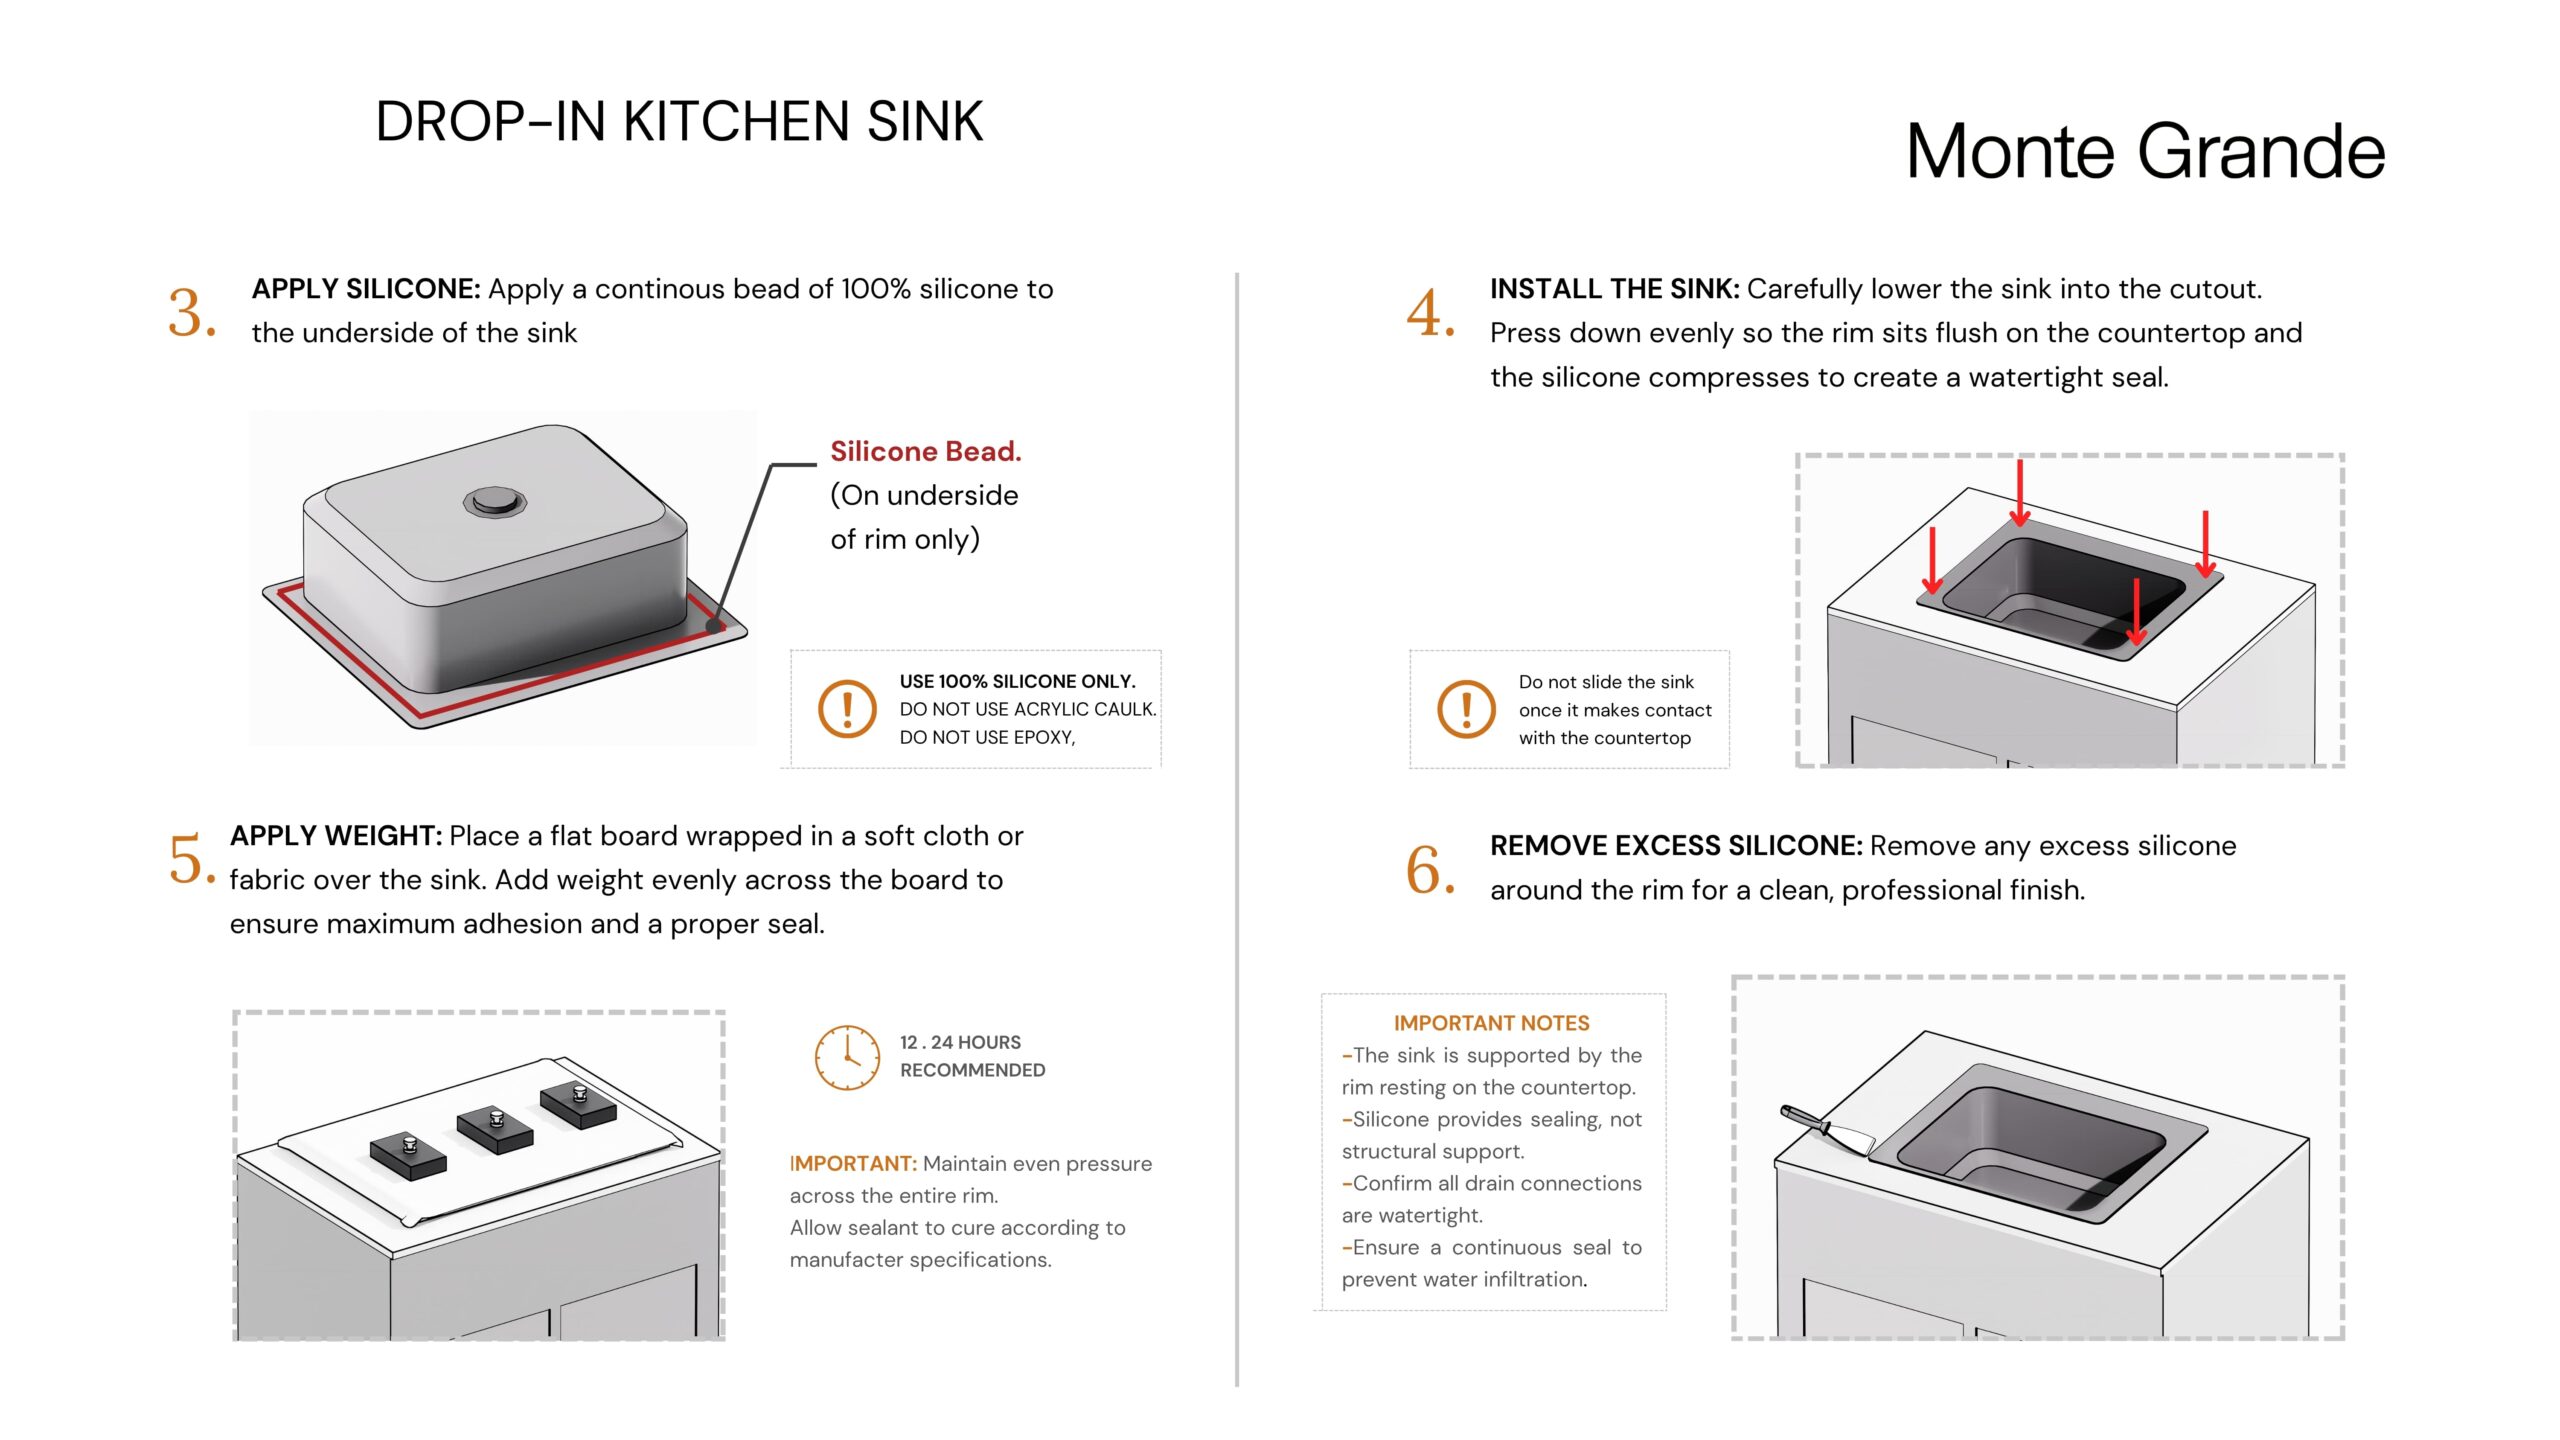
3. Apply Sealant
Apply a continuous bead of silicone to the underside of the sink rim.
4. Install the Sink
Carefully lower the sink into the cutout.
Press down evenly so the rim sits flush on the countertop and the silicone compresses to form a watertight seal.
5. Apply Even Pressure
Place a flat board wrapped in a soft cloth or fabric over the sink to protect the surface.
Apply evenly distributed weight on top of the board to ensure proper contact between the sink rim and the countertop.
Allow the sealant to cure according to the manufacturer’s recommendations.
6. Secure the Sink (if applicable)
Install mounting clips or brackets from underneath to hold the sink firmly in place.
Do not overtighten.
7. Level and Adjust
Use a level to confirm the sink is properly aligned in all directions while applying gentle pressure.
8. Clean Excess Sealant
Remove any excess silicone around the rim for a clean finish.
9. Install Drain
Install the drain according to the manufacturer’s instructions.
Do not overtighten.
Important Notes
The sink is supported by the rim resting on the countertop
Silicone provides sealing, not structural support
Ensure a continuous seal to prevent water infiltration
Avoid shifting the sink once it makes contact

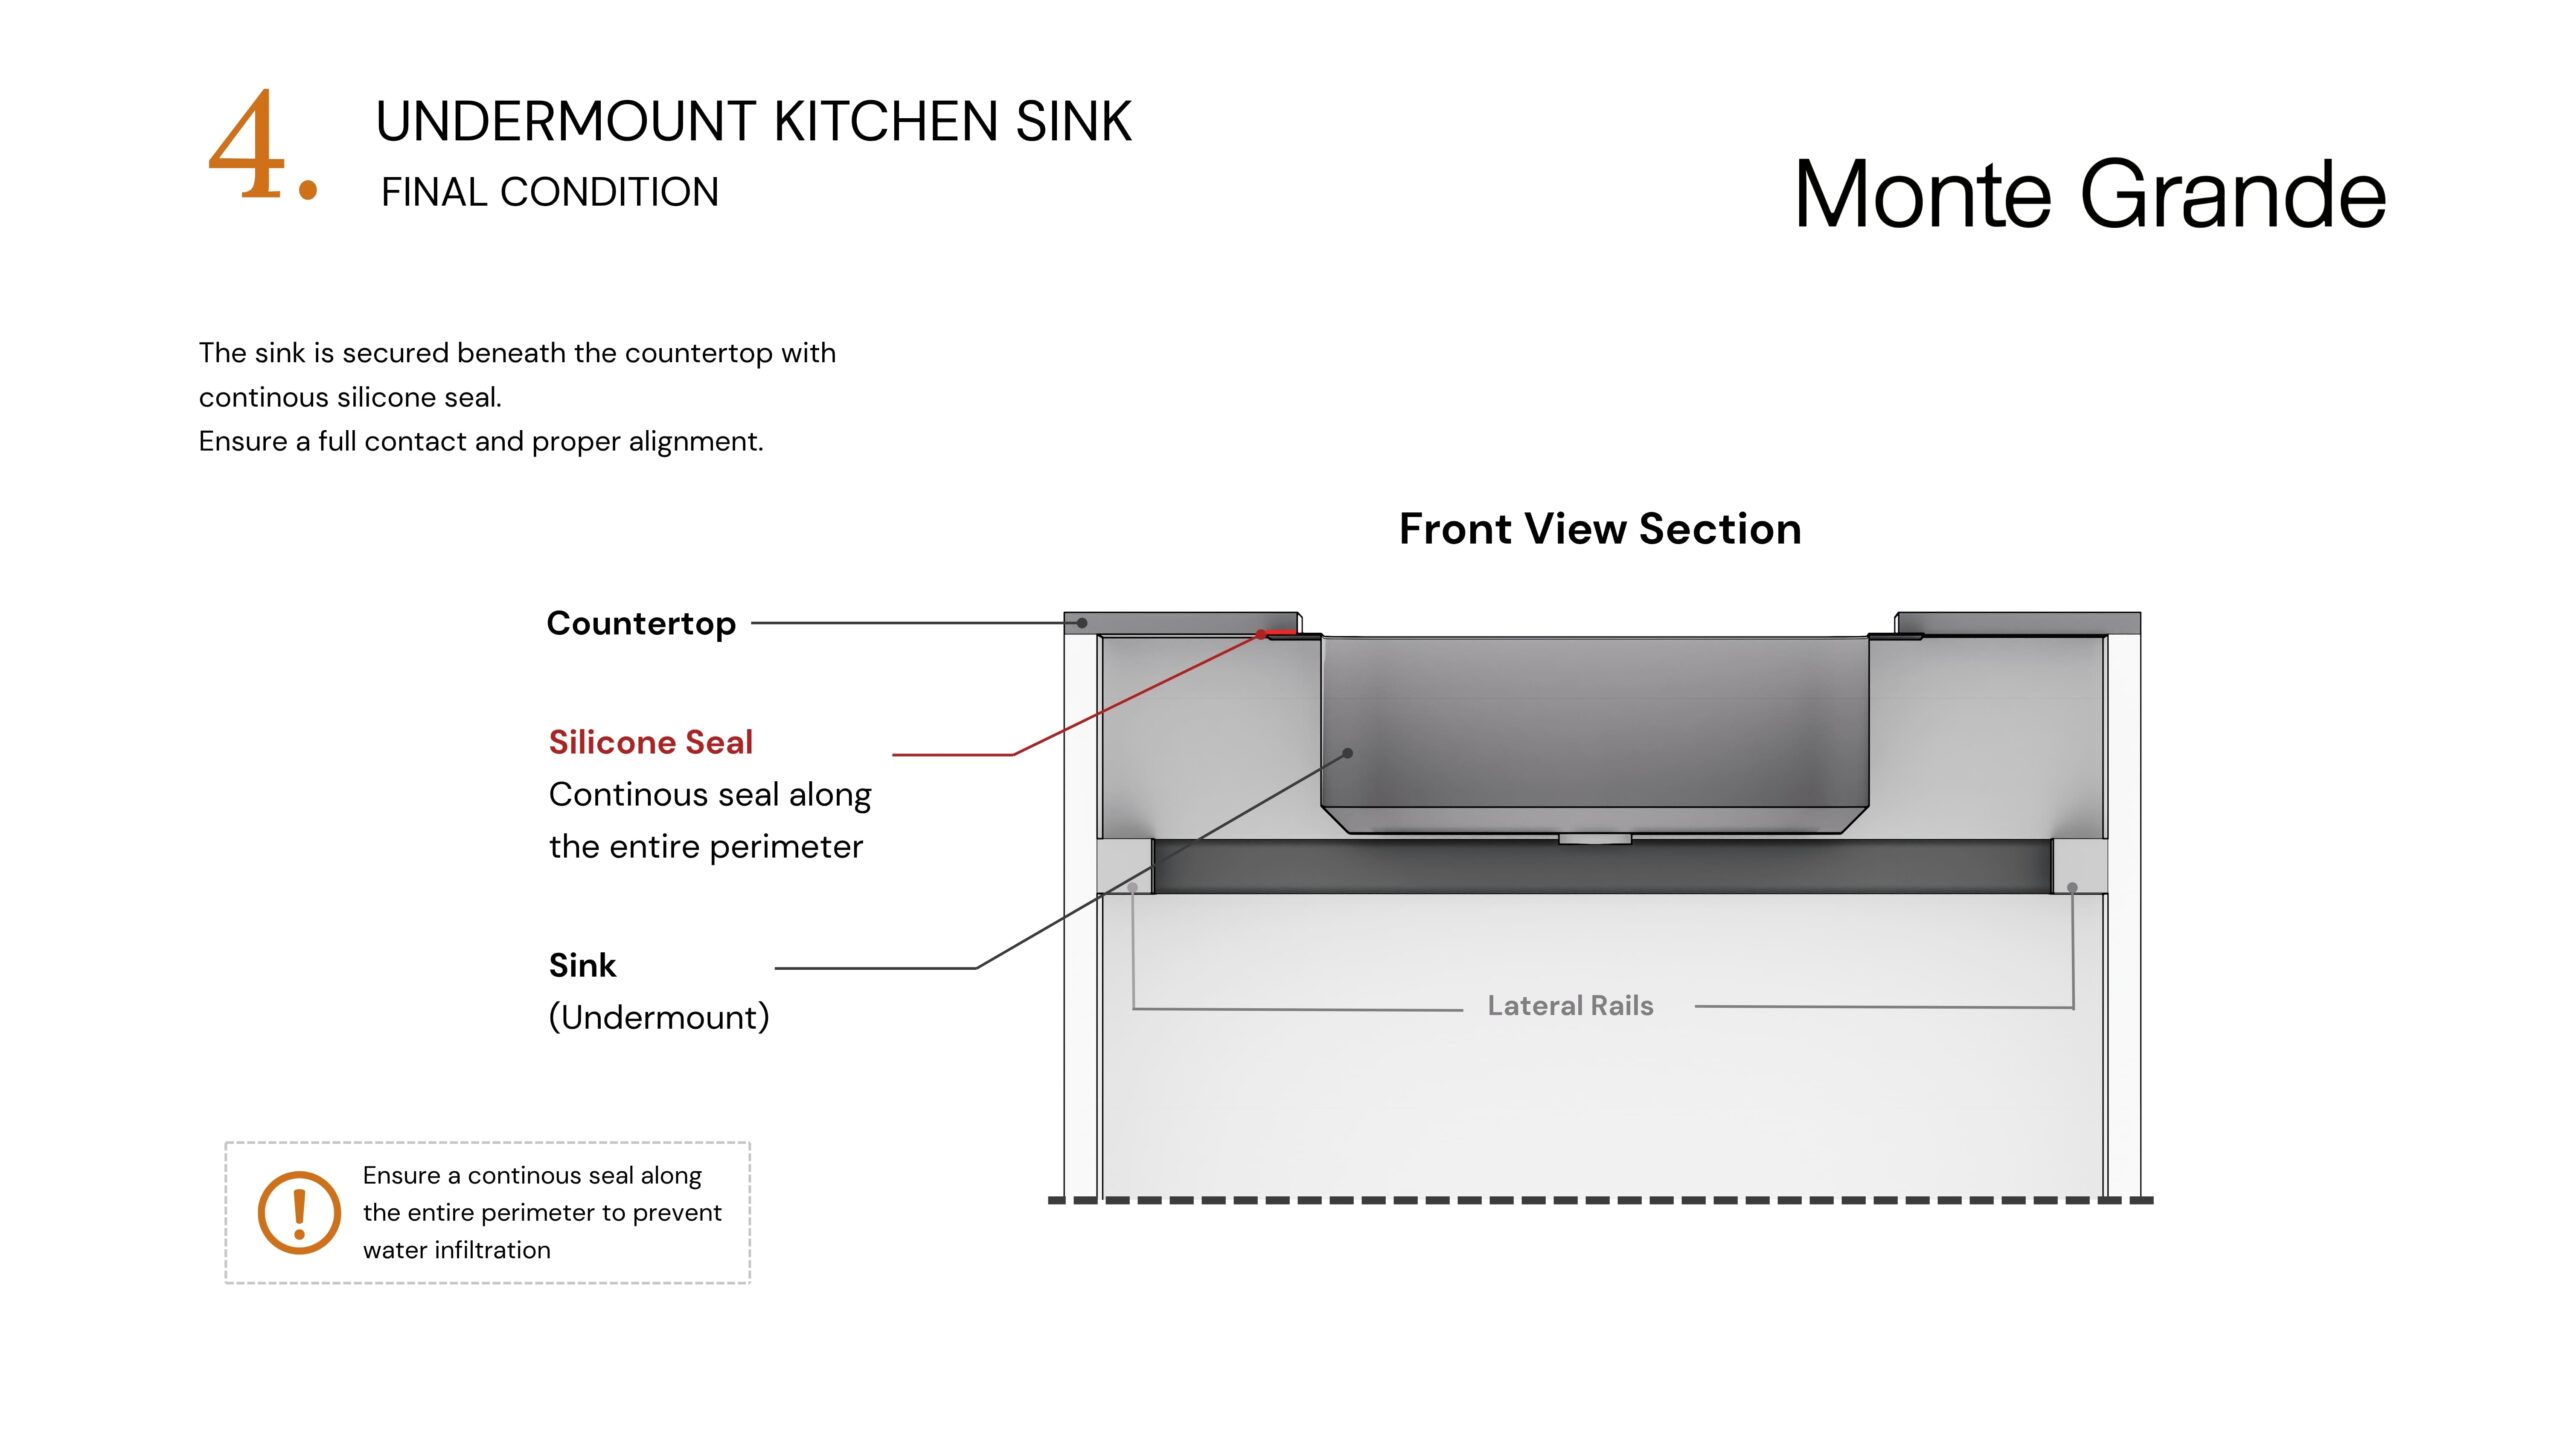
Installation Guide — Undermount Kitchen Sink
OVERVIEW
Undermount sinks are installed beneath the countertop, creating a seamless edge. Proper structural support and sealing are essential for a secure and long-lasting installation.
Before You Begin
Professional installation is strongly recommended
Ensure the cabinet can support the full weight of the sink
Use the actual sink as reference for dimensions
Confirm countertop cutout and alignment
Verify faucet clearance
Installation Steps
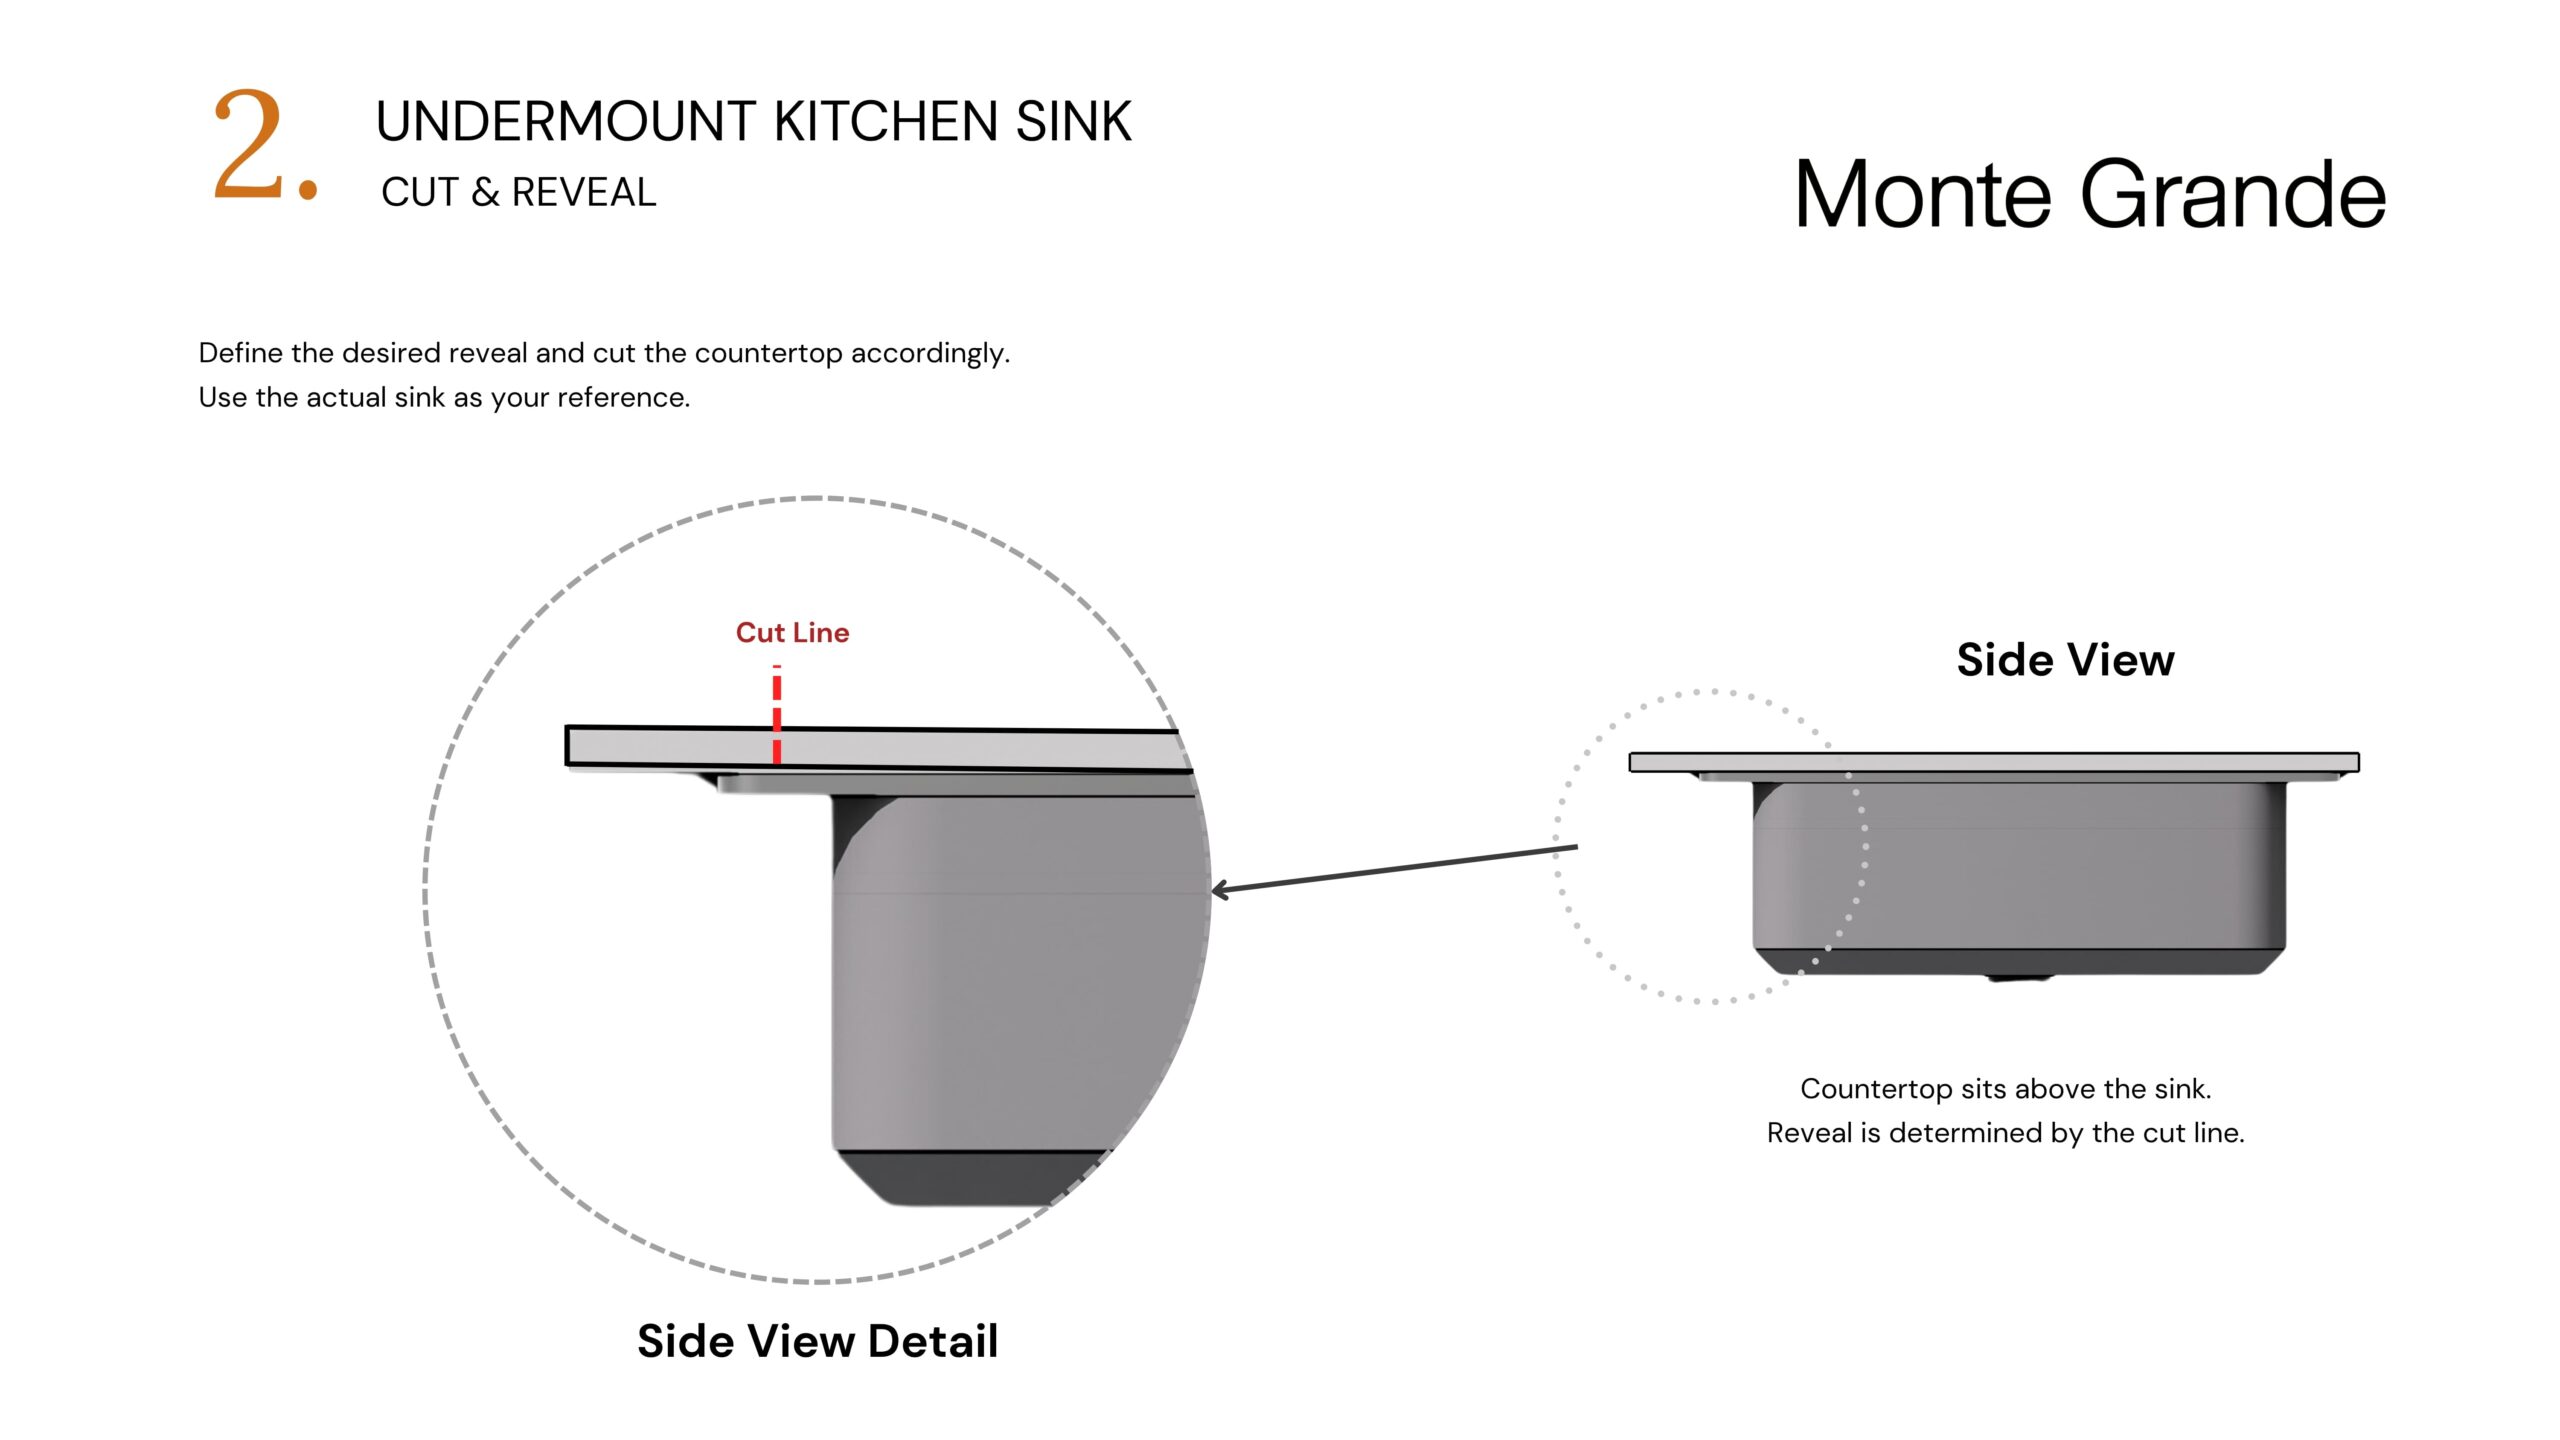
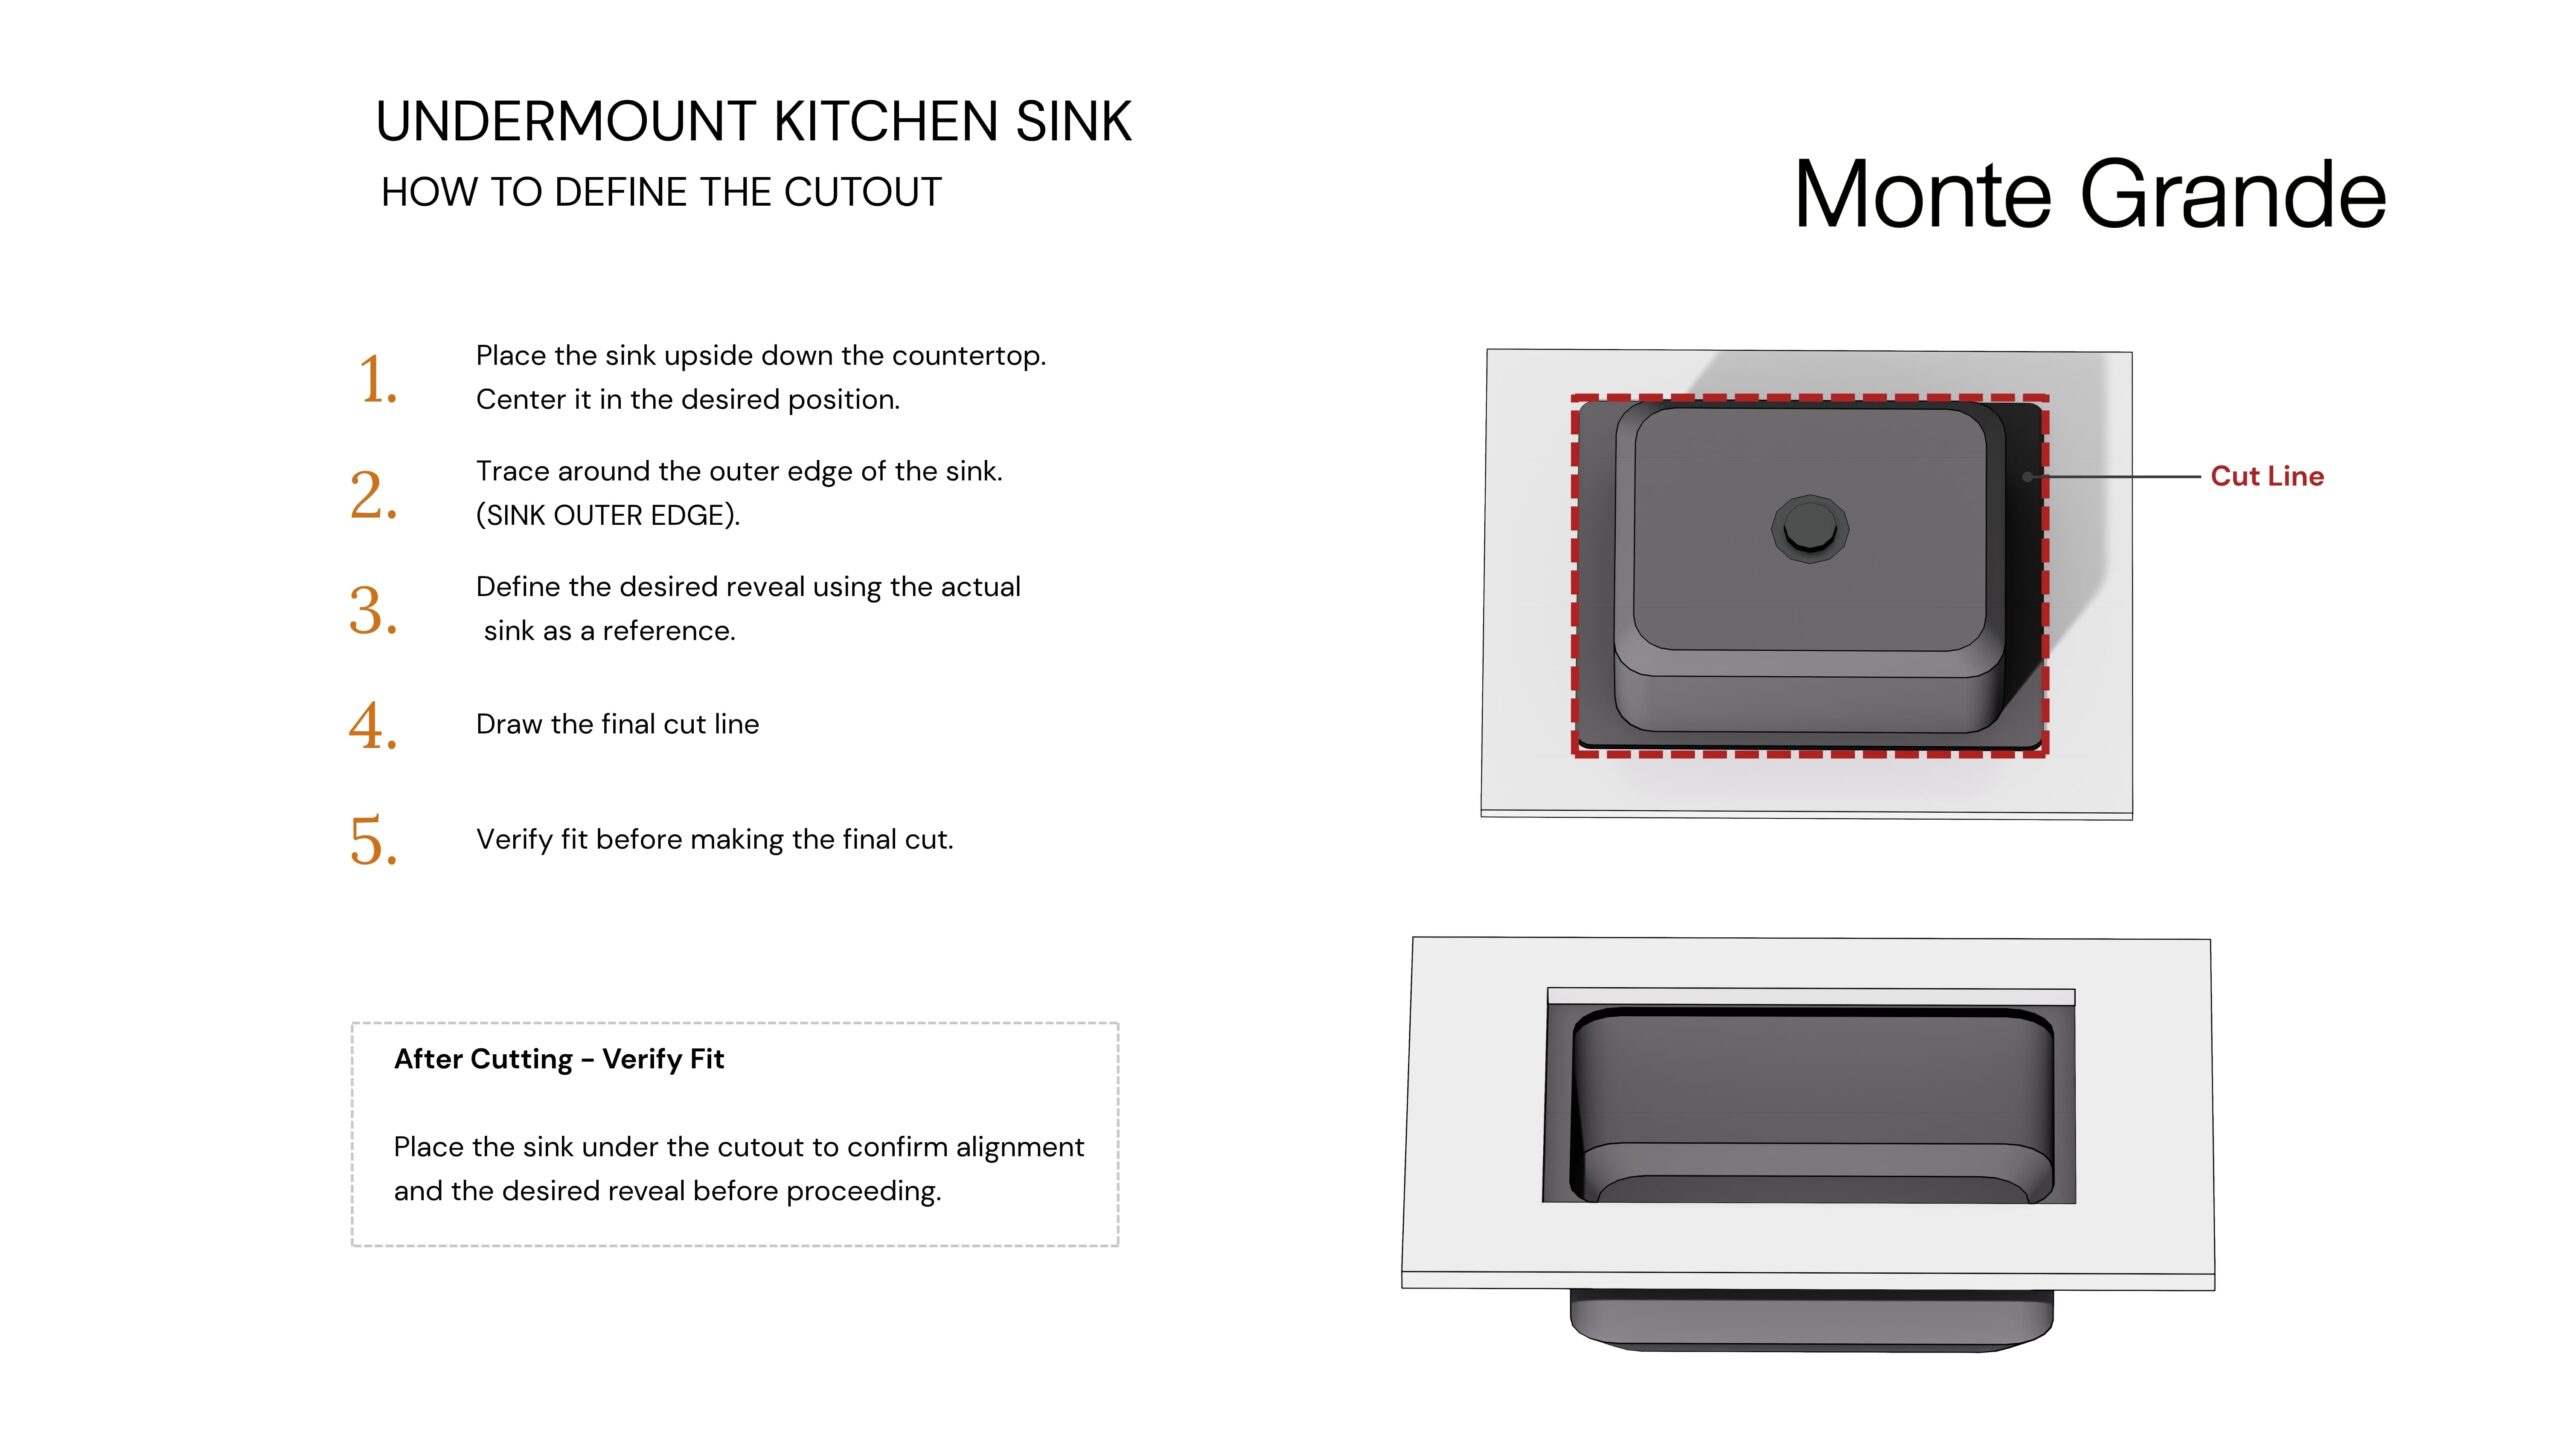
1. Mark the Cutout
Place the sink upside down on the countertop and trace the outer edge.
Define the desired reveal (flush, positive, or negative), and adjust the cut line accordingly.
2. Cut the Countertop
Cut the countertop following the defined cut line.
Test fit the sink beneath the opening to ensure proper alignment.
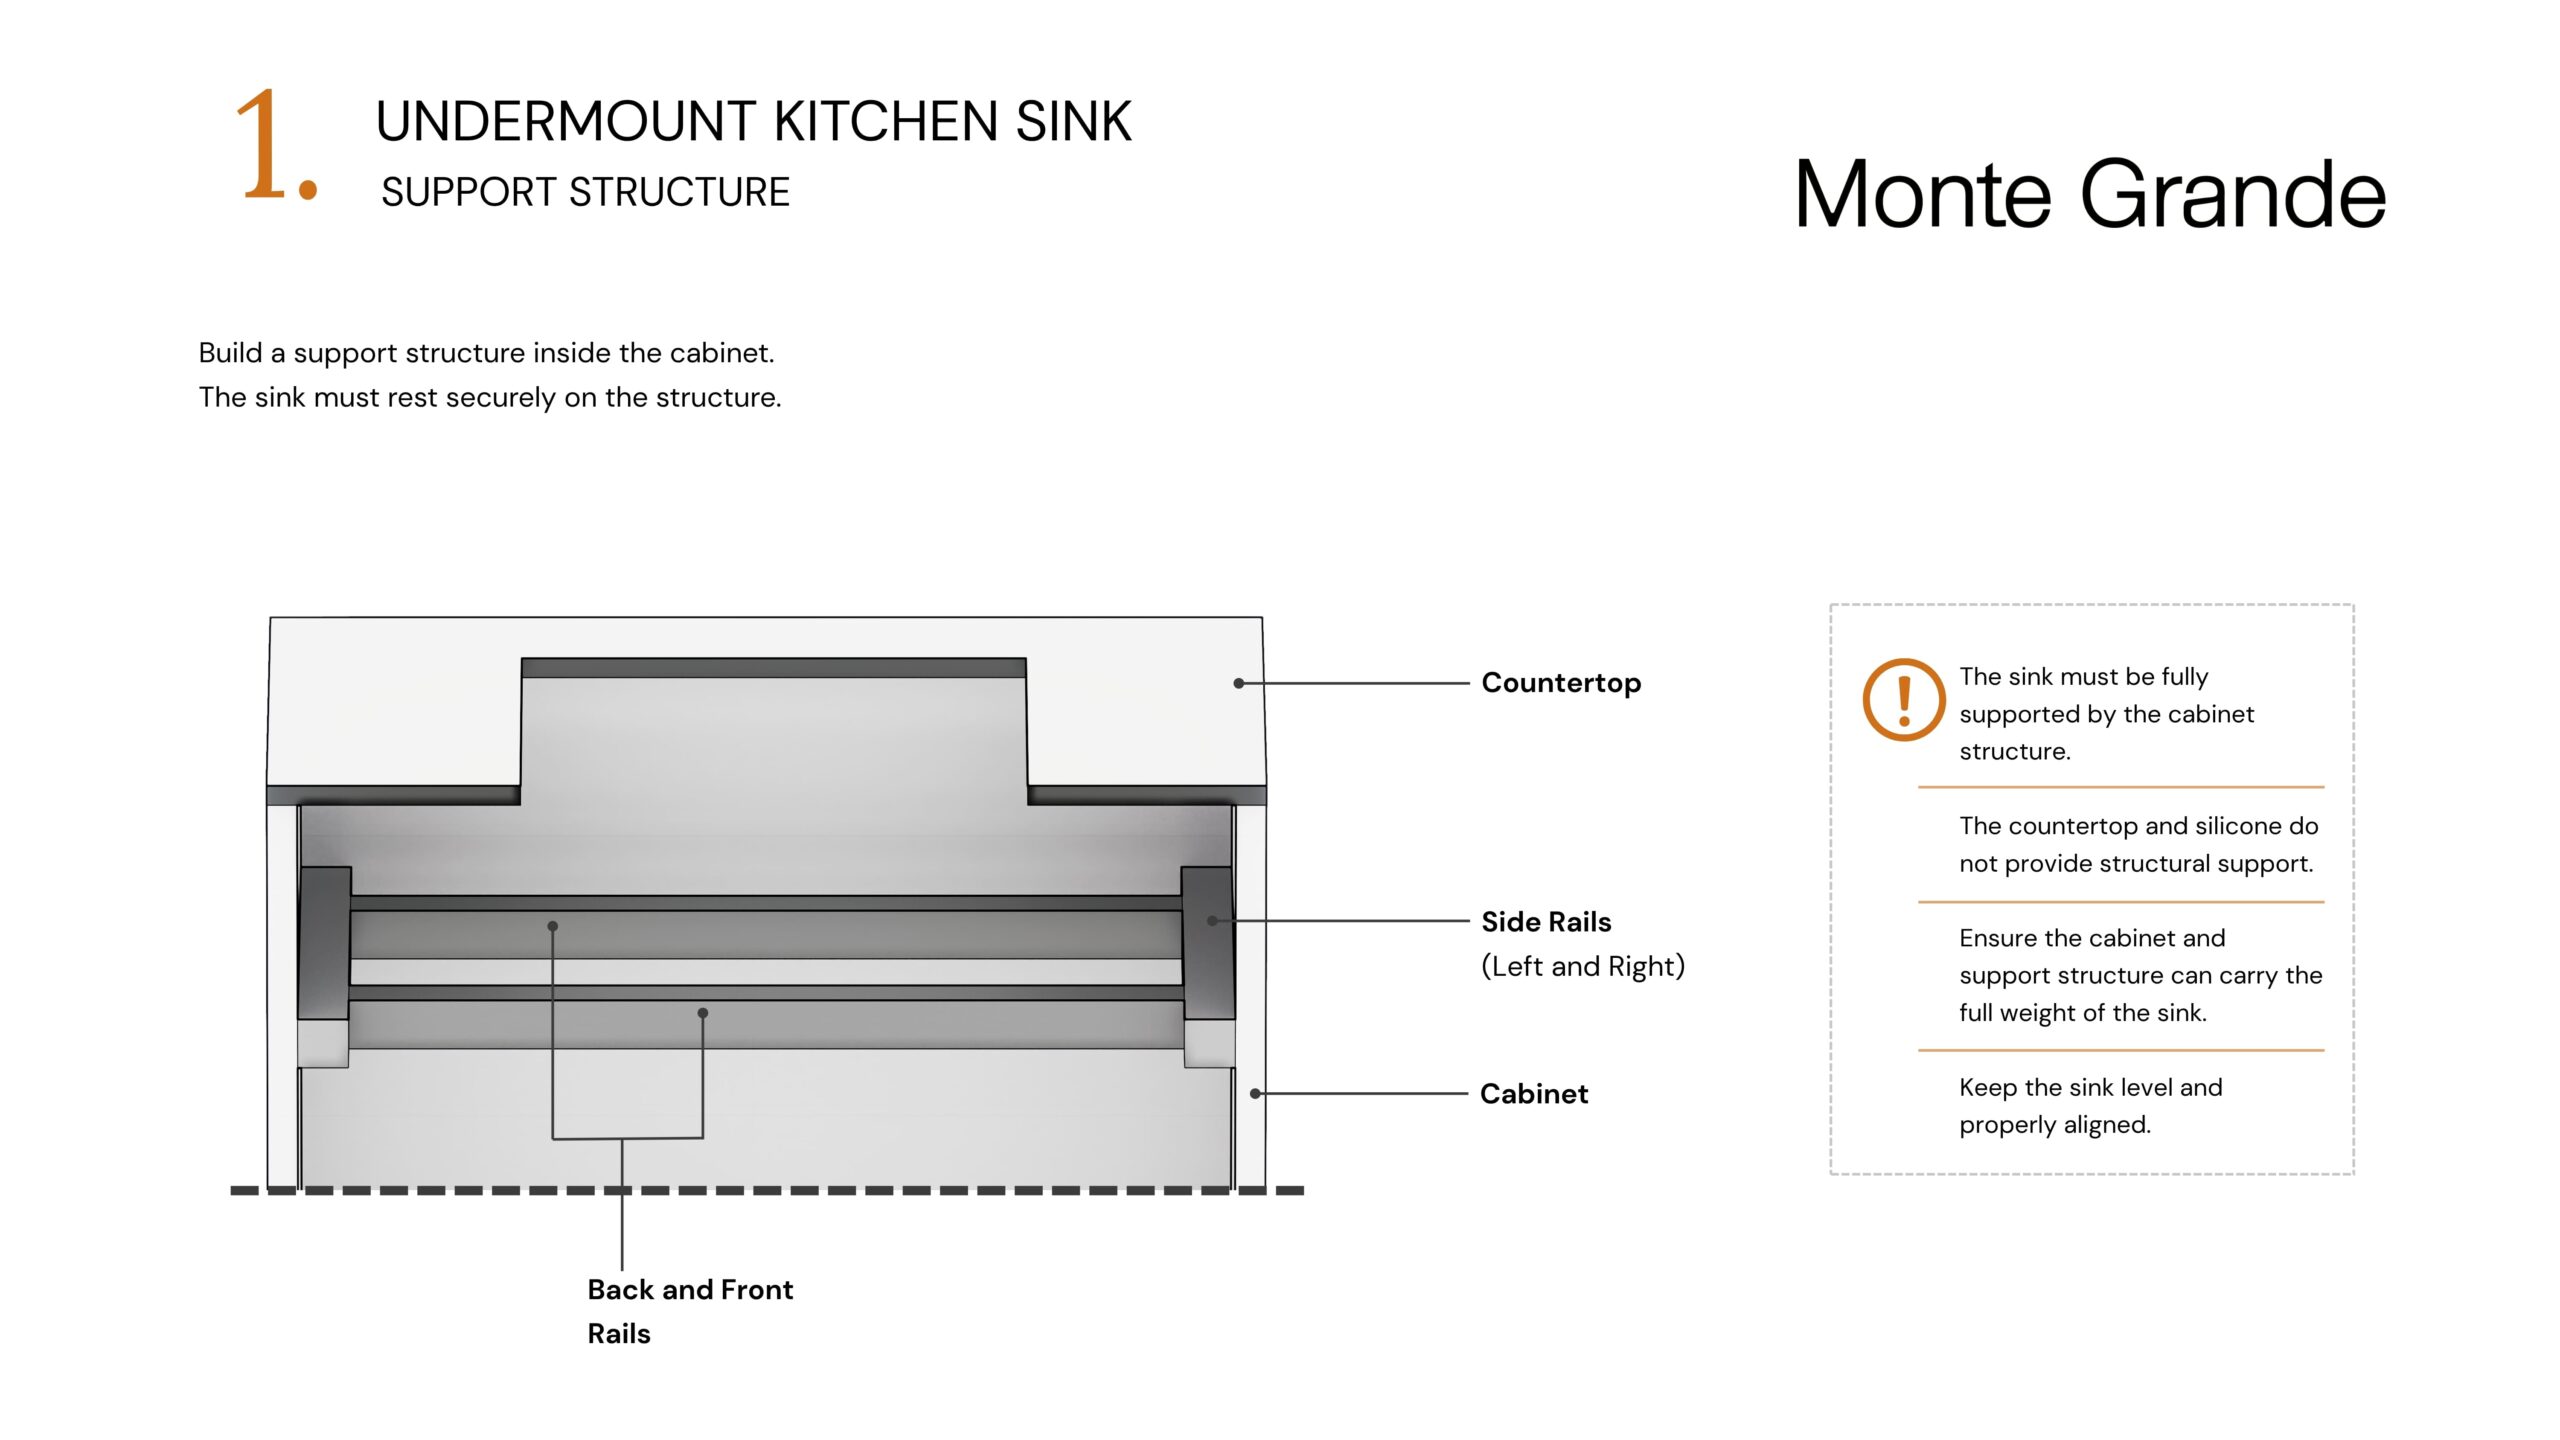
3. Install the Support Structure
Install rails or a support frame inside the cabinet.
The sink must rest fully supported on this structure.
4. Position the Sink
Place the sink beneath the countertop opening and align it properly.
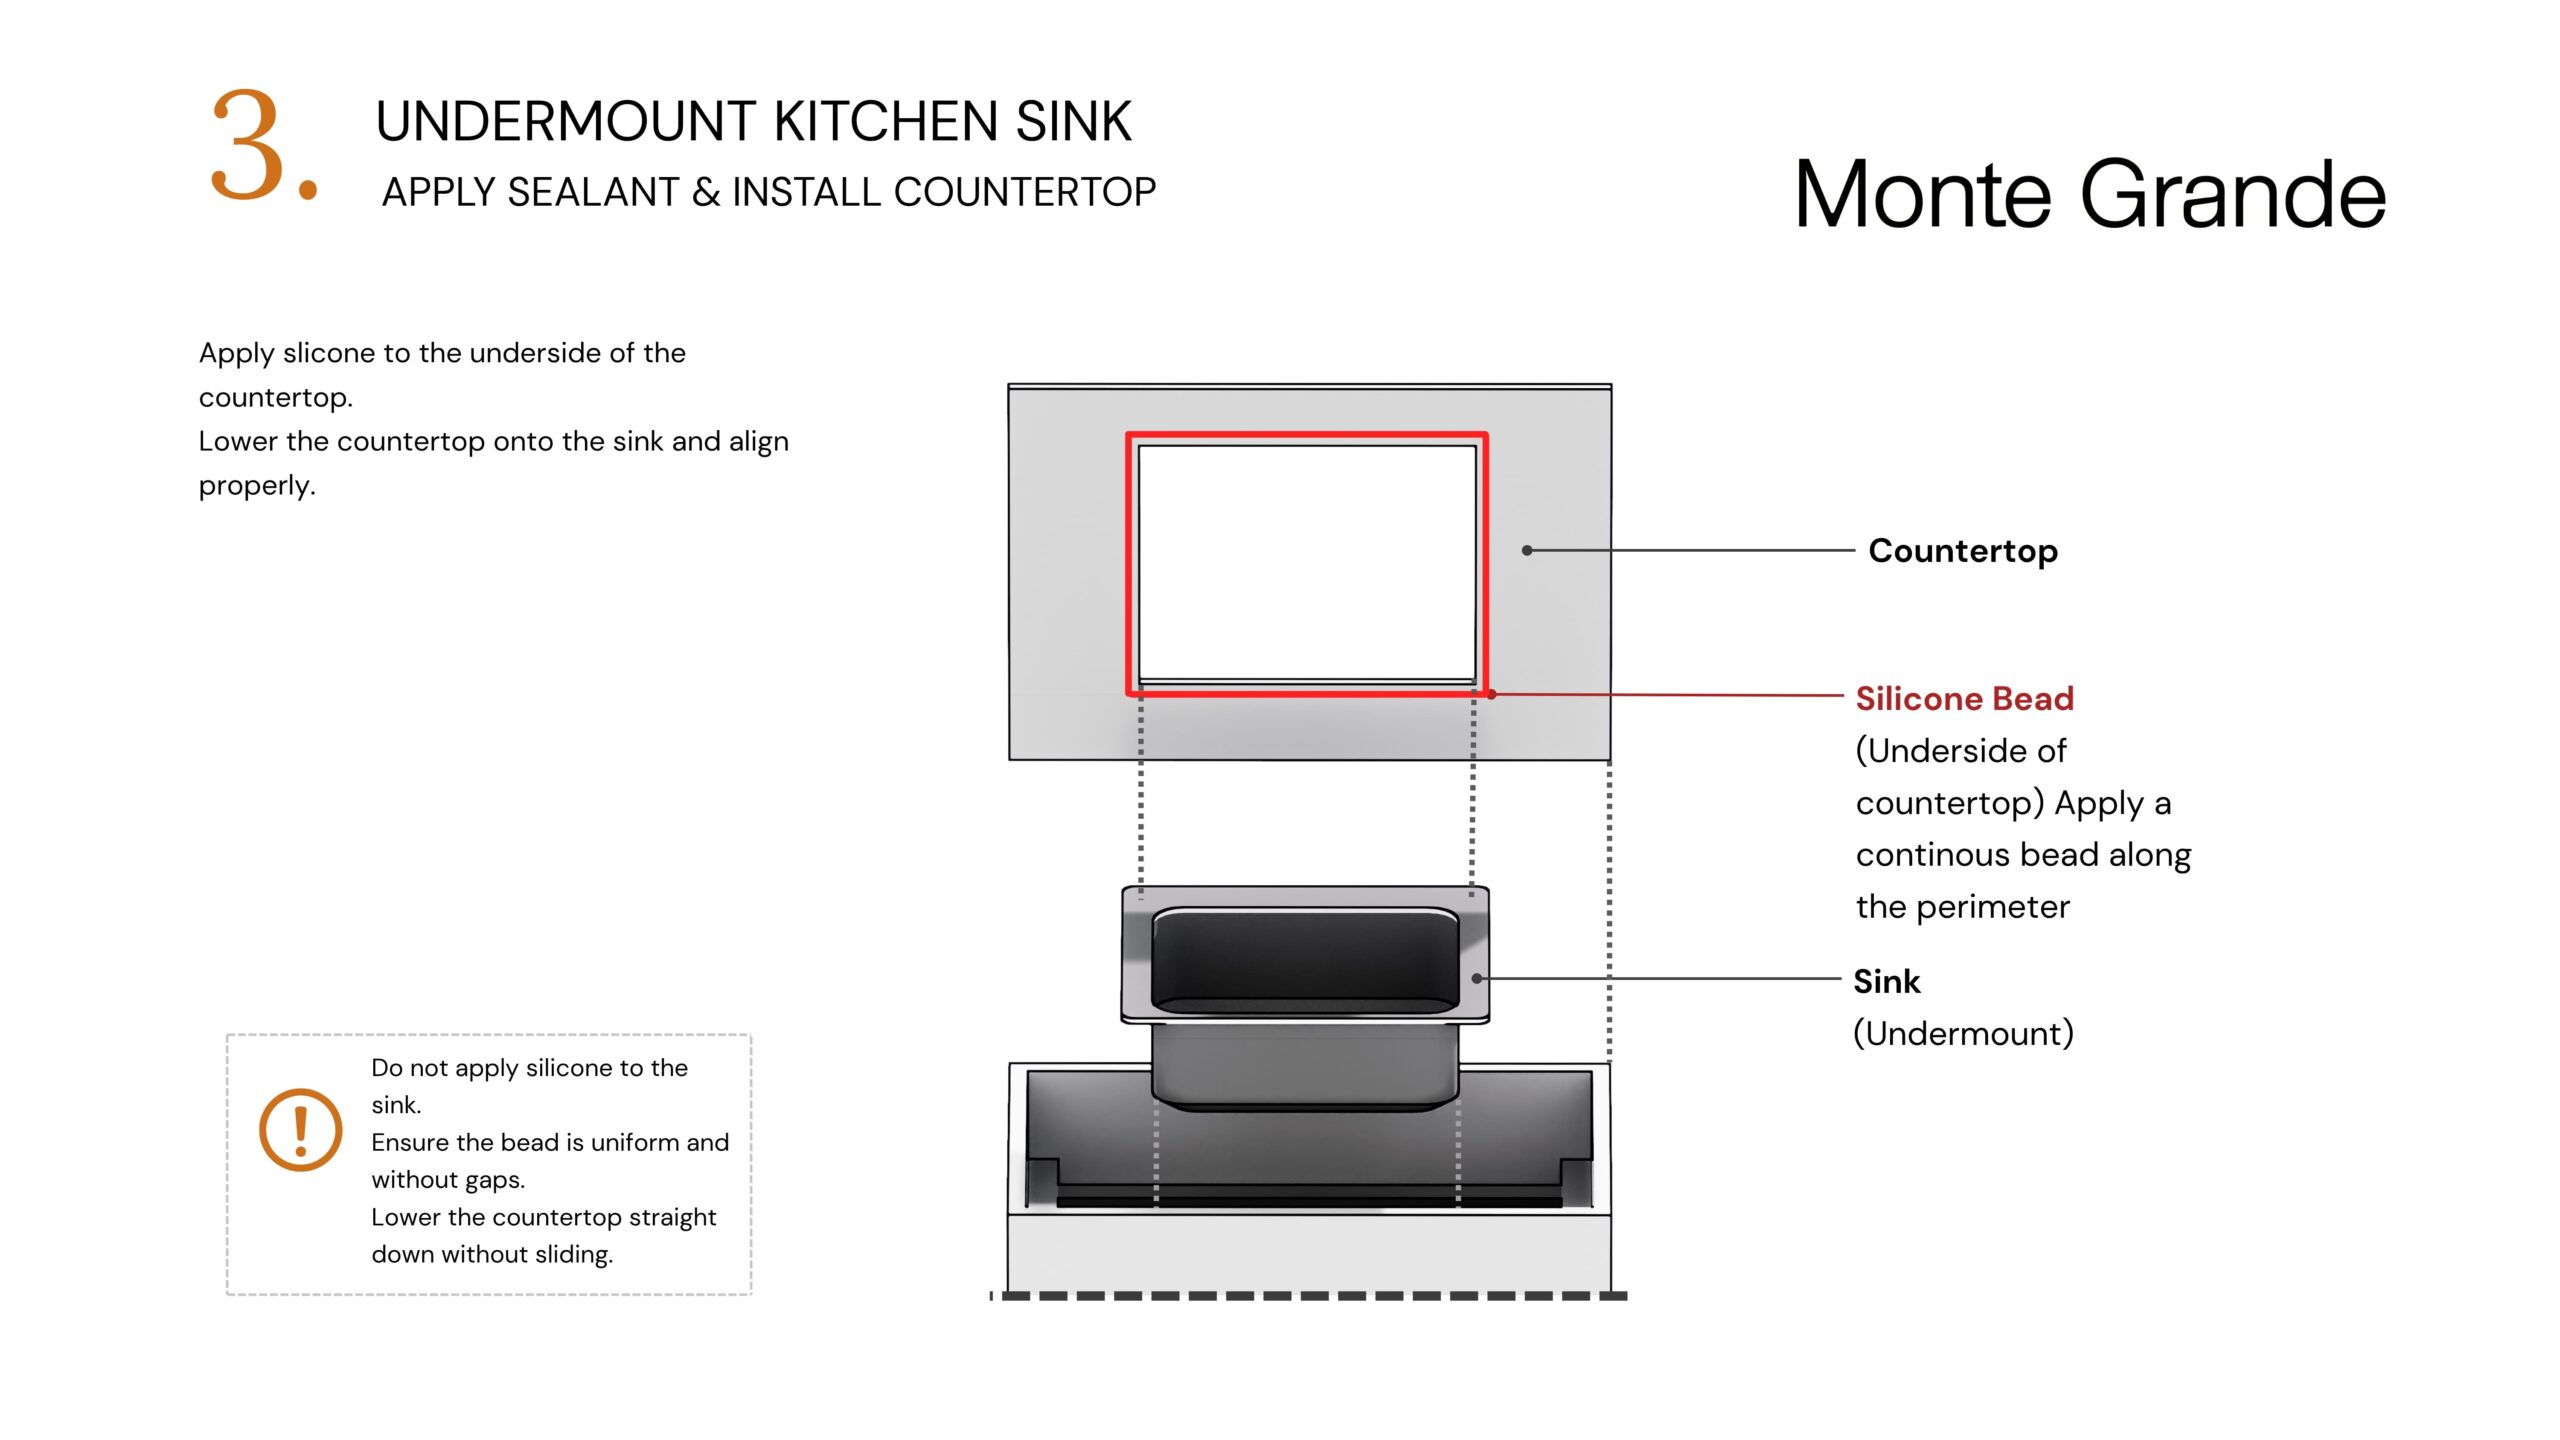
5. Apply Sealant
Apply a continuous bead of silicone to the underside of the countertop, along the cutout perimeter.
6. Secure and Apply Pressure
Raise the sink into position against the countertop.
Use clamps, internal supports, or bracing to apply even pressure while the silicone cures.
Allow the sealant to cure according to the manufacturer’s recommendations.
7. Clean Excess Sealant
Remove any excess silicone from the inner edge for a clean finish.
8. Install Drain
Install the drain according to manufacturer instructions.
Do not overtighten.
Important Notes
The sink must be supported by the cabinet structure—not the countertop
Silicone provides sealing, not structural support
Maintain even pressure during curing
Ensure a continuous seal to prevent water infiltration
Do not shift the sink once it makes contact
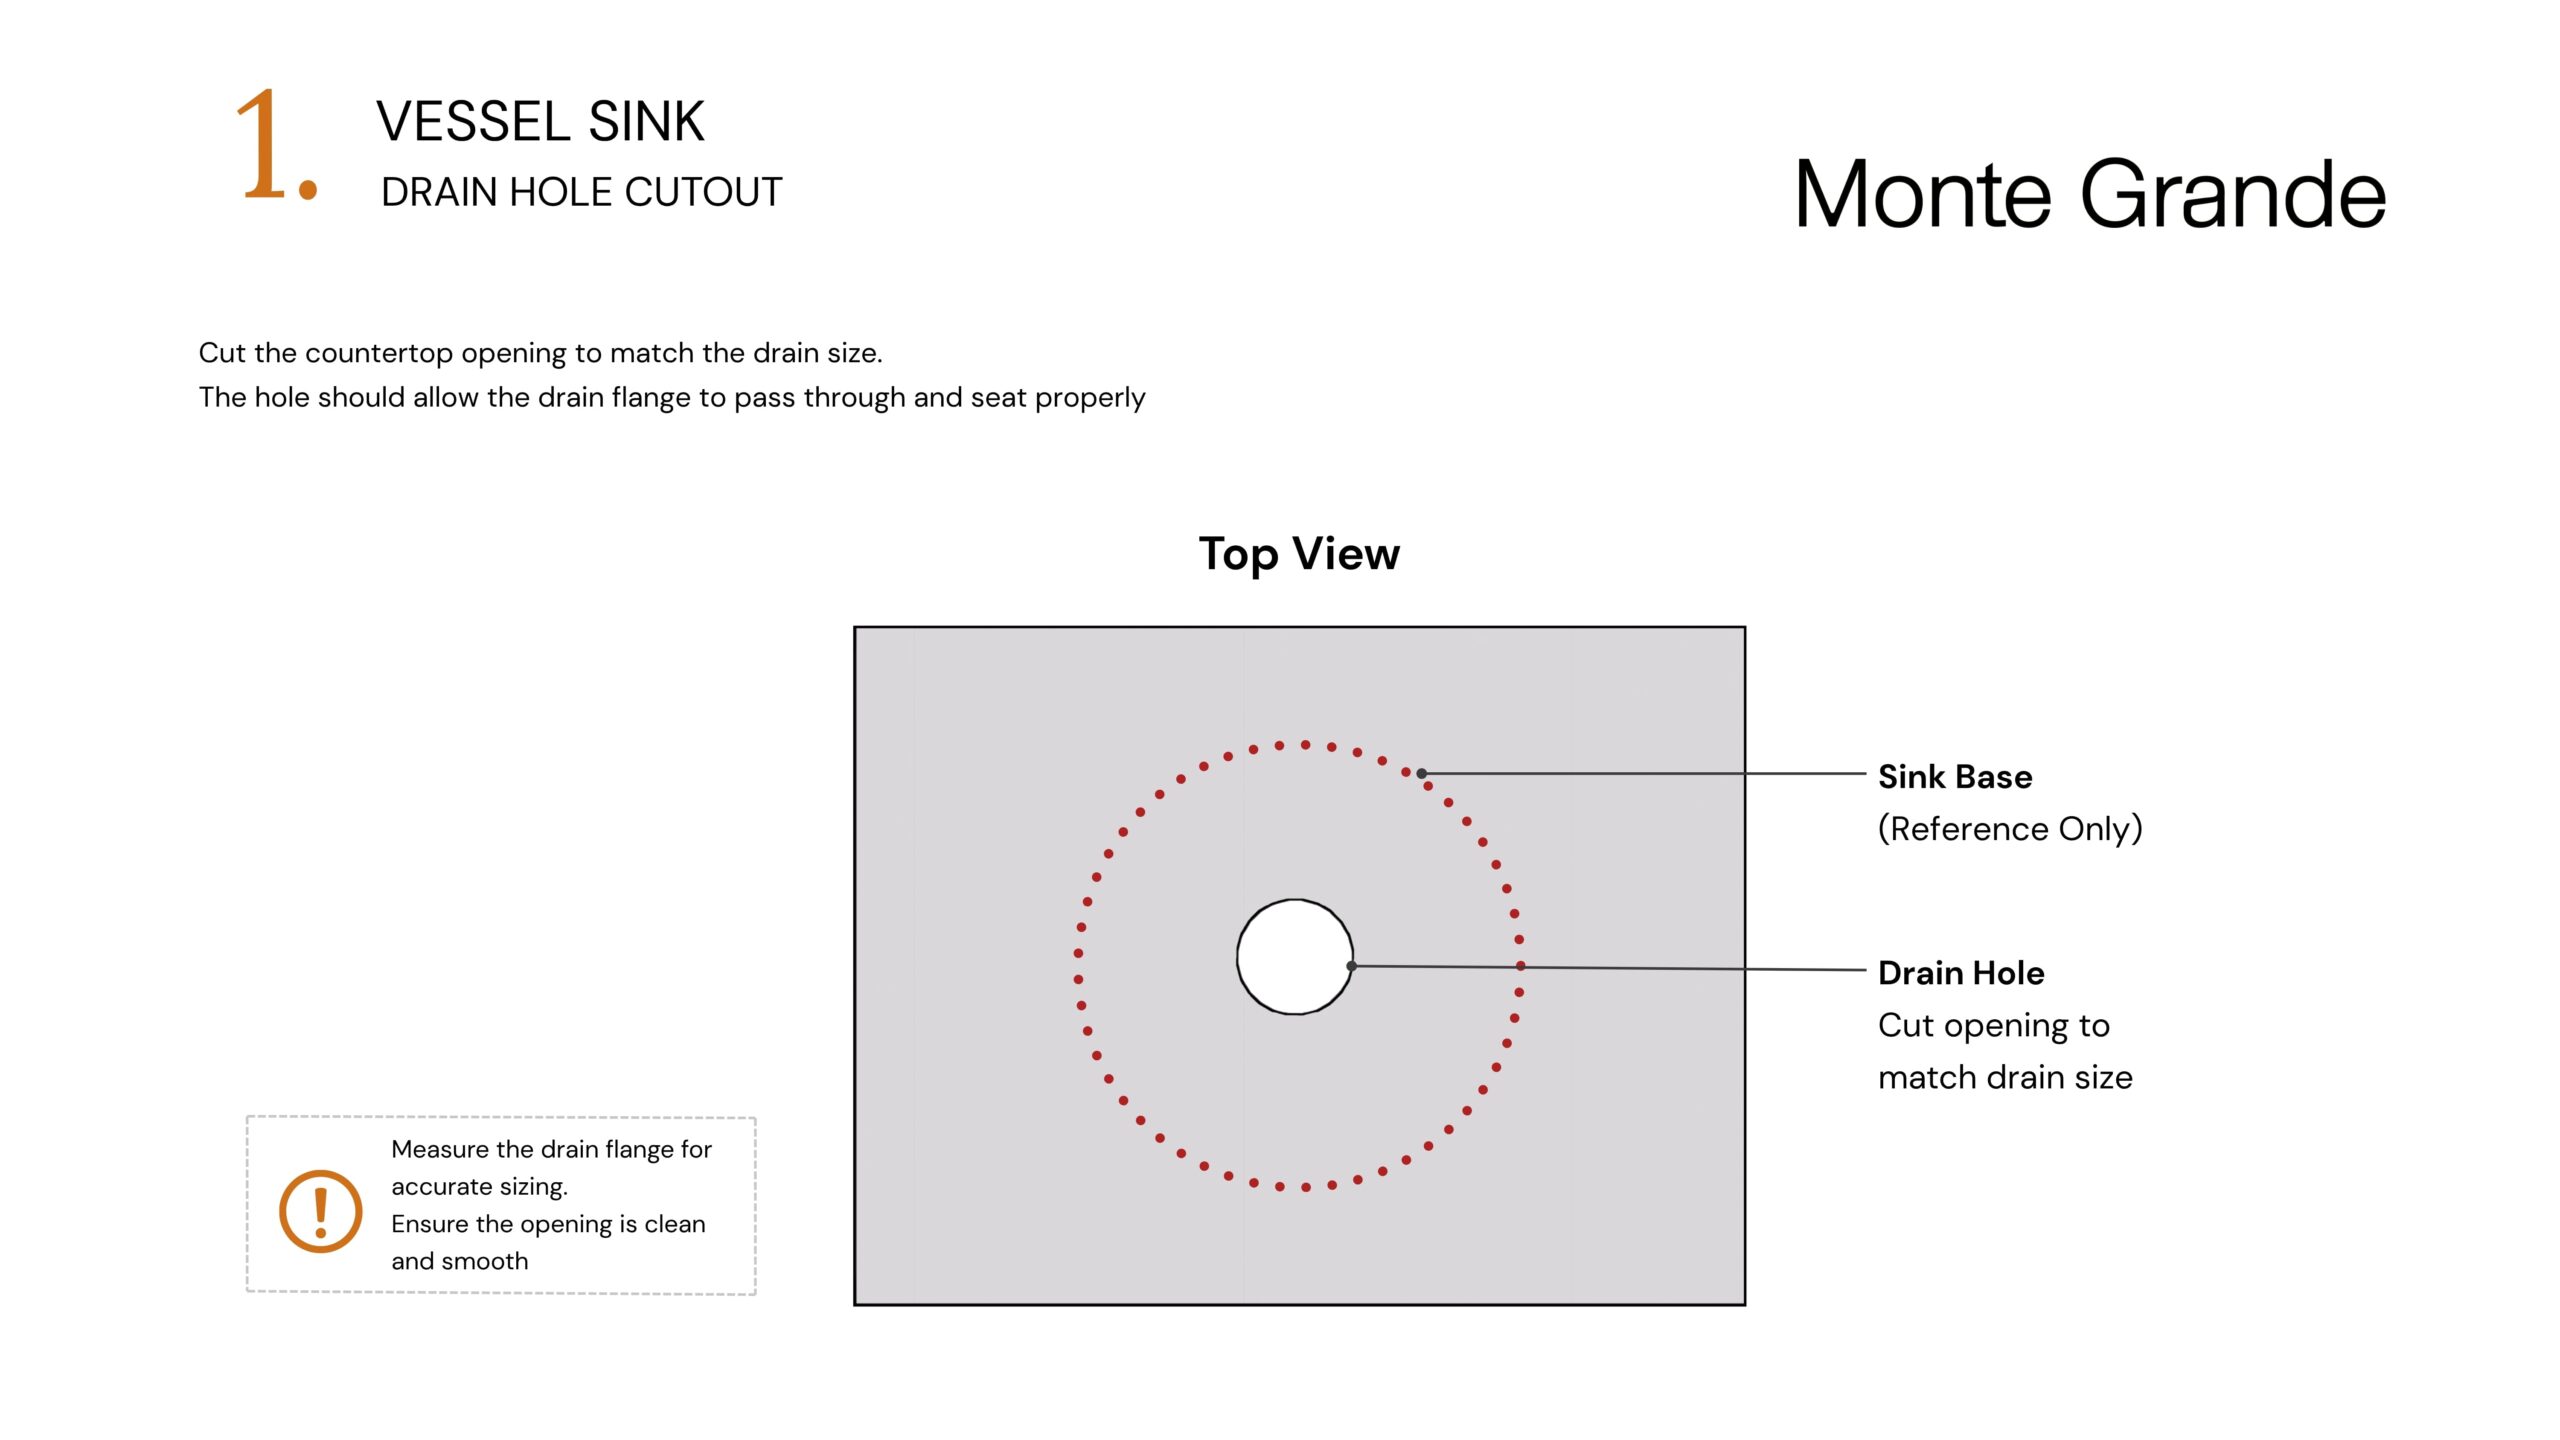
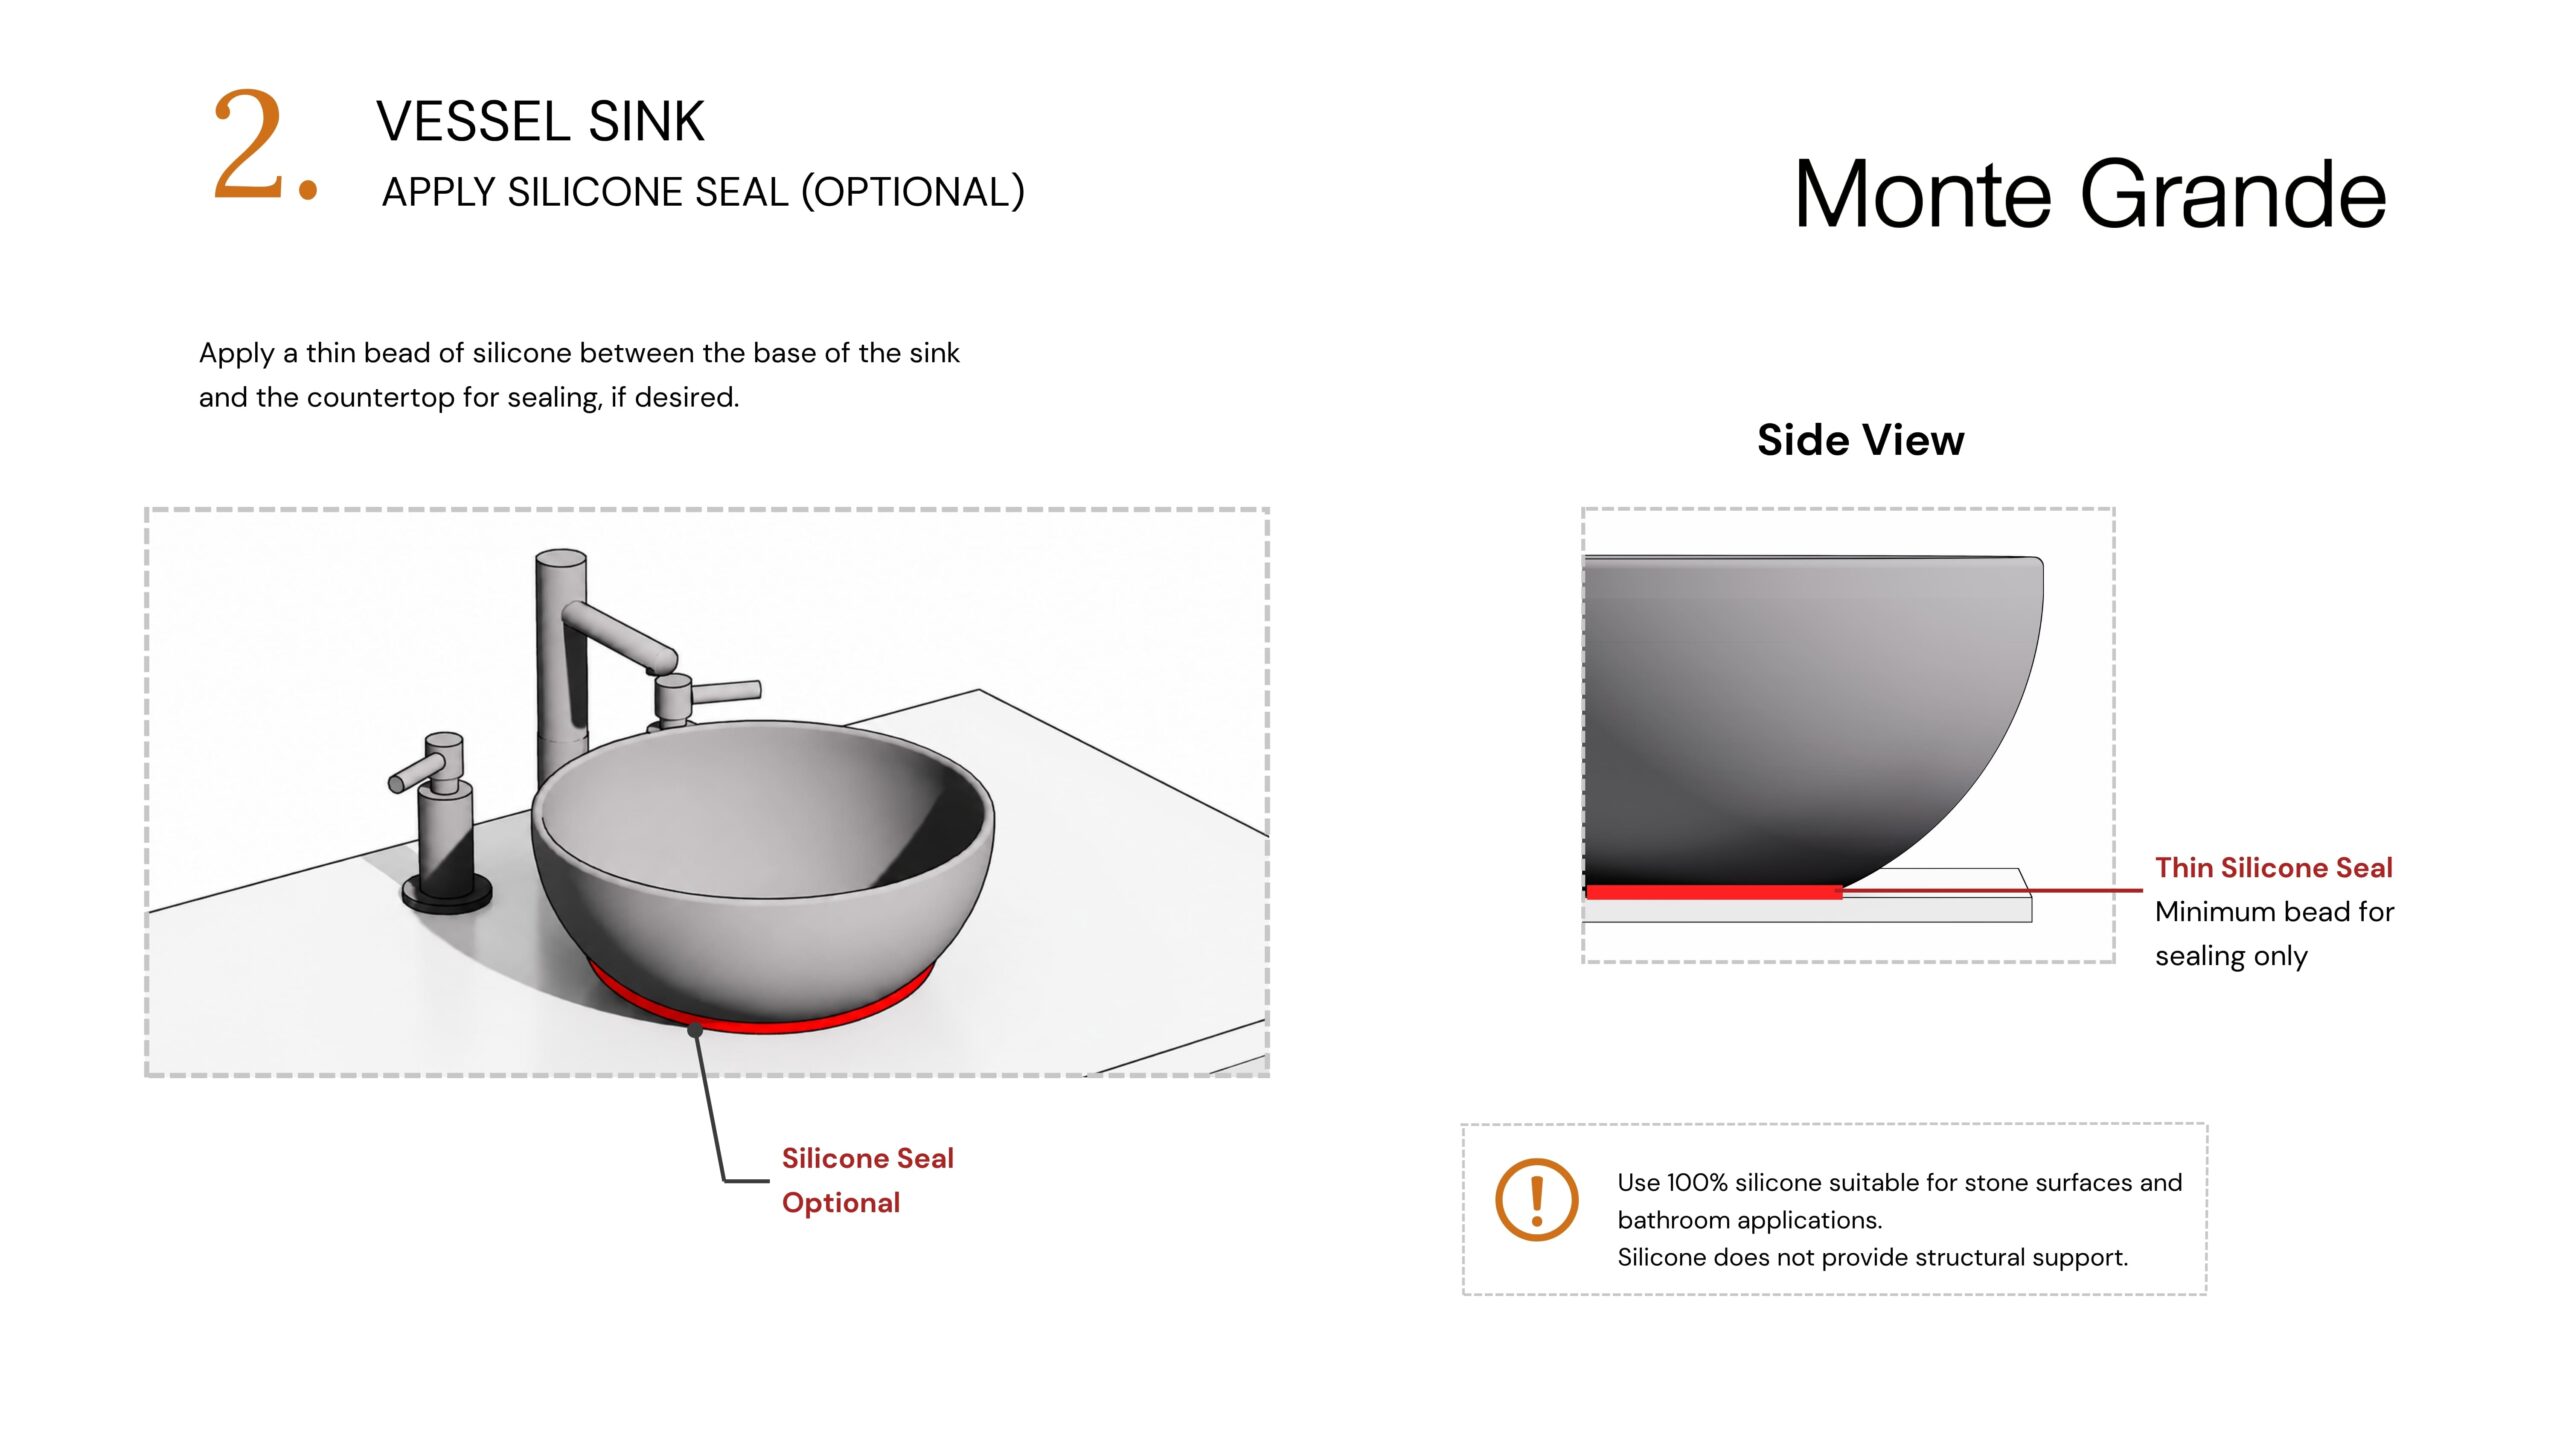
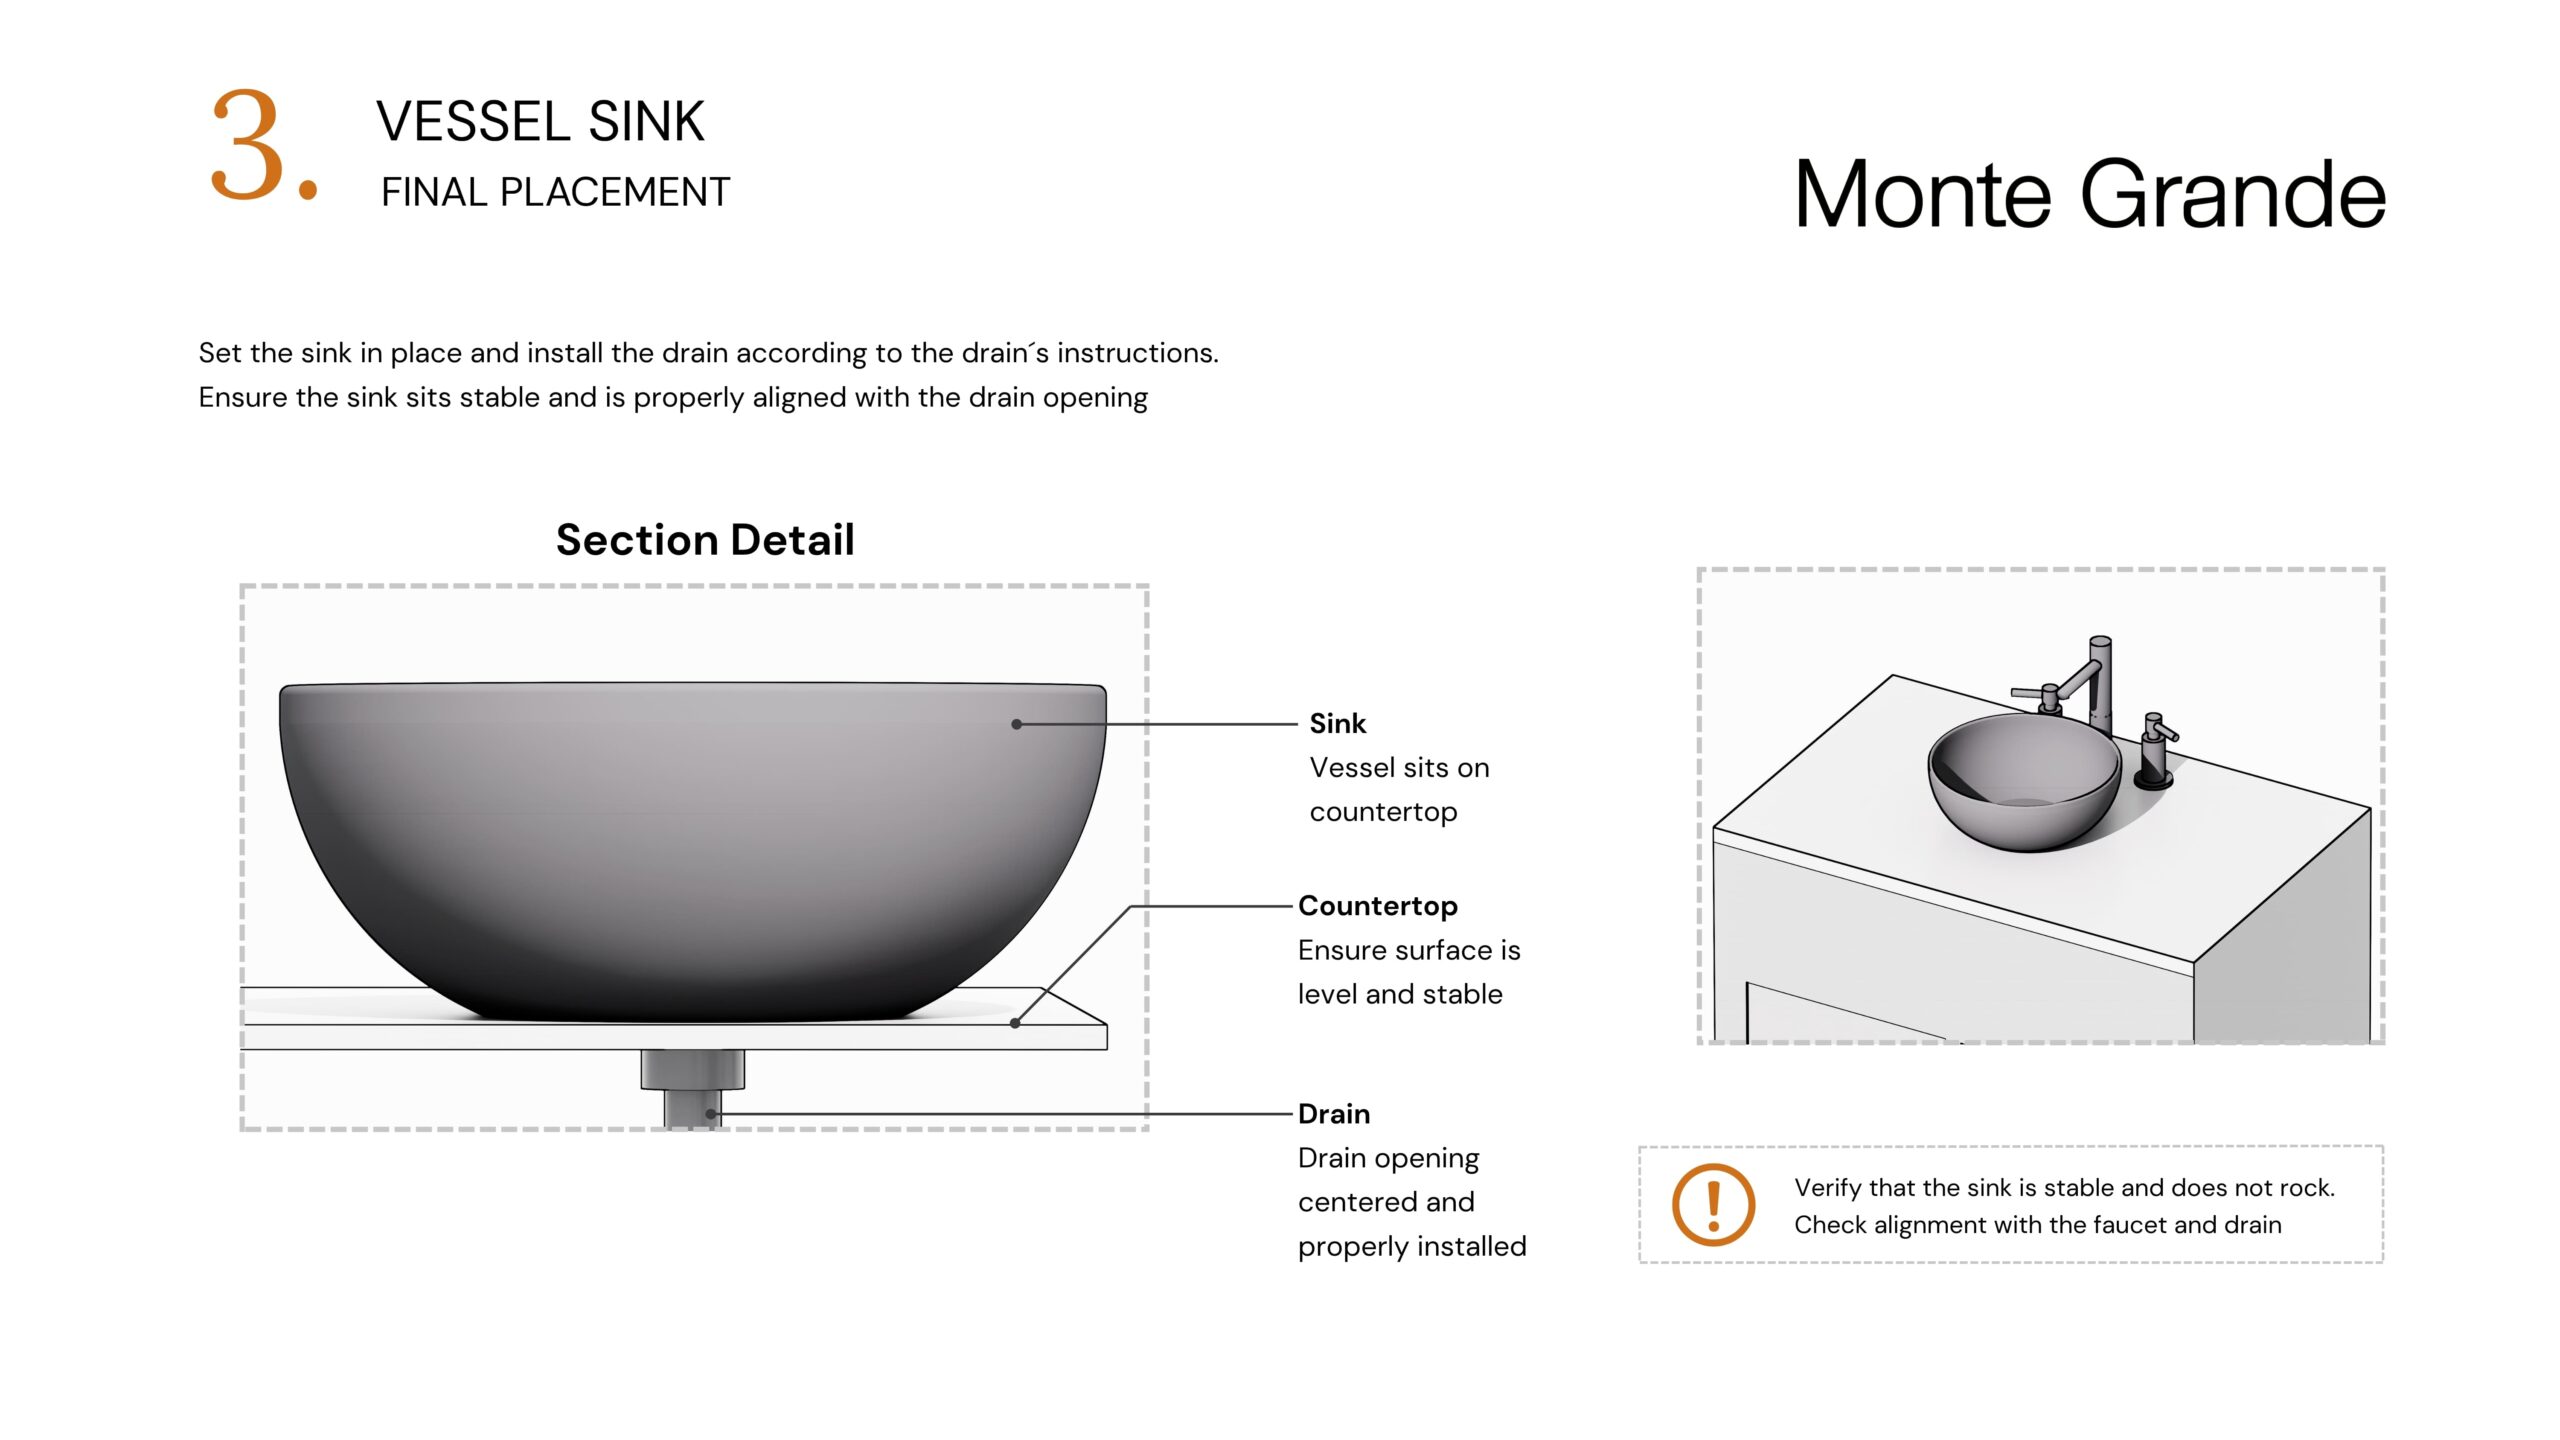
Installation Guide — Vessel Sink (Bath)
OVERVIEW
Vessel sinks are installed above the countertop, with the drain passing through a single cutout. Proper alignment and sealing ensure stability and prevent water infiltration.
Before You Begin
Professional installation is recommended
Verify drain compatibility and size
Ensure the countertop is level and properly supported
Confirm faucet height and clearance
Use the actual sink as reference for measurements
Installation Steps
1. Mark the Drain Opening
From the underside or top, mark the location of the drain hole using the sink’s drain flange as reference.
2. Cut the Countertop
Cut the opening to match the drain size.
Ensure the hole allows proper seating of the drain flange.
3. Test Fit the Sink
Place the sink on the countertop and verify that:
The drain aligns properly
The base sits stable and flush
4. Apply Sealant (if required)
If sealing is desired, apply a thin bead of silicone at the contact area between the sink base and the countertop.
Keep it minimal—this is for sealing, not support.
5. Install the Sink and Drain
Place the sink in position and install the drain according to manufacturer instructions.
Ensure the drain is properly tightened and the sink sits stable.
6. Clean Excess Sealant
Remove any excess silicone for a clean, professional finish.
Important Notes
The sink is supported by its base resting on the countertop
Silicone is optional and used only for sealing
Ensure the sink sits stable and does not rock
Avoid excessive force when tightening the drain
Tabletop — Care & Placement
Placement & Support
Ensure the tabletop is placed on a level, rigid base that provides full and even support.
Avoid point loads or uneven surfaces that may cause stress or deformation.
Recommended Fixing Method
Due to the plywood core, we recommend securing the tabletop to the base using screws from underneath.
Fasten through the base into the plywood core
Use evenly distributed fixing points
Do not overtighten
Important
Select screw lengths appropriate for the tabletop thickness to avoid penetrating the surface
Our tabletops are typically 1.5″ or 2″ thick — screws must be shorter than the total thickness
Allow for slight material movement; do not rigidly restrict the metal surface
Handling
Lift and position the tabletop carefully. Do not drag it across surfaces.
Use
Avoid dragging objects across the surface and prolonged contact with acidic substances.
Maintenance
Refer to the Copper & Brass Maintenance Guide for proper care.